+ Reply to Thread
Page 1 of 55 1231151 ... LastLast
Results 1 to 25 of 1368

Thread: Aluminum Chris Craft Roamer refit project

  1. #1
    Join Date
    Jan 2011
    Location
    Mid-Atlantic, USA
    Posts
    1,220
    Post Thanks / Like

    Aluminum Chris Craft Roamer refit project

    Hi.
    I've been a lurker here mostly for a few years, but I thought I'd post here about my Chris Craft Roamer 46 project. She's an aluminum hull from 1969 that we've gutted and are bringing back to life. The most recent blog article covers some welding I did with my Miller TB 280NT and Spoolmatic 30A to fix a problem created by the professional fabricator who built my aft deck enclosure.

    Well...professional fabricator was what his business card said, anyway.

    Anyway, here's the link to the welding job I did last weekend: 1969 Chris Craft Roamer 46 Refit: De-SMIB-ifying the Helm Door Opening

    And here's the link to the start of the whole blog: http://1969chriscraftroamer46.wordpress.com/about/

    Cheers,
    Q

  2. #2
    Join Date
    May 2008
    Location
    Orange, TX
    Posts
    18,081
    Post Thanks / Like

    Re: Aluminum Chris Craft Roamer refit project

    Thanks for the update Q. Glad the TB is getting the job done for you again.

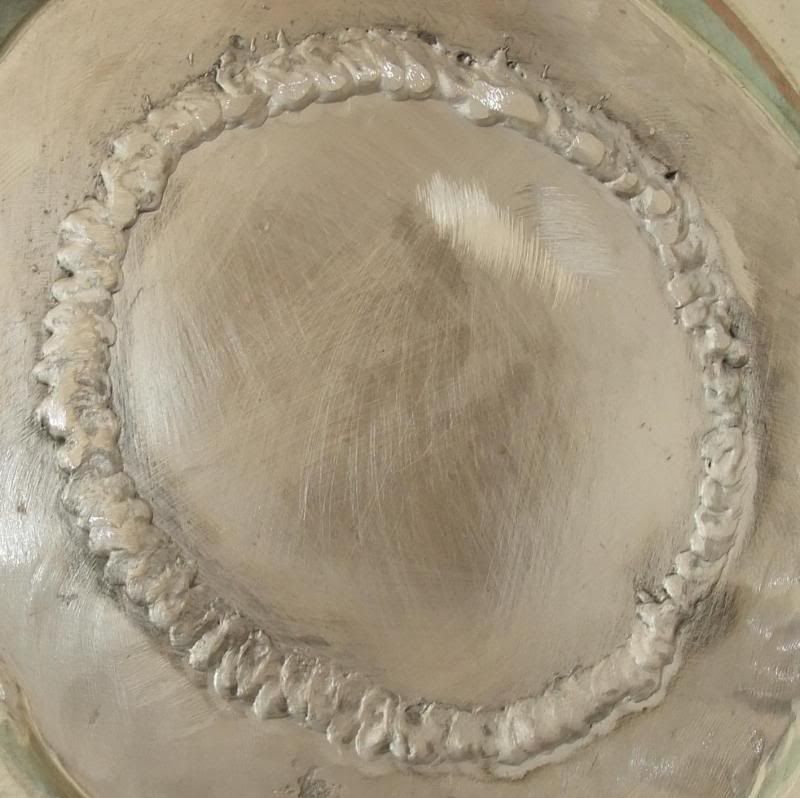
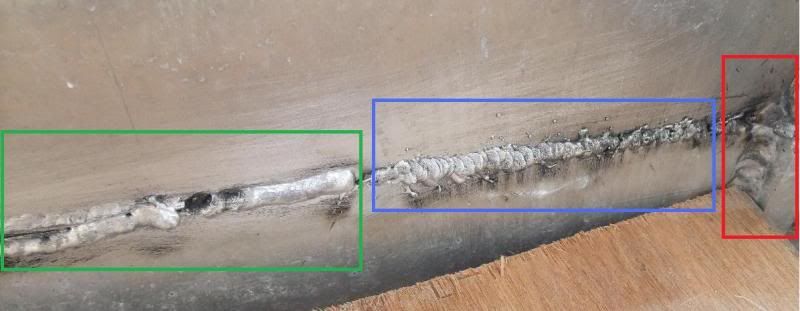
    Can't really tell from most of the photos but it almost looks like your welding in short circuit mode rather than spray as it should be with aluminum. In other words - need more power Scotty! Should sound like a hissing noise instead of frying bacon. Probably something in the realm of +/- 26volts and lots of WFS (Wire Feed Speed).

    Keep the updates coming!.
    MM200 w/Spoolmatic 1
    Syncrowave 180SD
    Bobcat 225G Plus - LP/NG
    MUTT Suitcase Wirefeeder
    WC-1S/Spoolmatic 1
    HF-251D-1
    PakMaster 100XL
    '68 Red Face Code #6633 project
    Star Jet 21-110

    Save Second Base!

  3. #3
    Join Date
    Sep 2010
    Location
    southwest VA
    Posts
    633
    Post Thanks / Like

    Re: Aluminum Chris Craft Roamer refit project

    Damn, that's a hell of a project! Have you been keeping up with zeyang's aluminum boat build?

    I've got a 1967 Renken 15'-er that I'm trying to get lake-worthy again. Bought the boat and trailer last year for $300. Going to have do a little aluminum welding myself on that project - lower unit casting has a 2.5" x 1" hole in it (I have the chunk that fits in there). No nasty refrigerators or anything in it, but it did have lots of leaves, beer cans, and even a steak knife in it (previous owner had her sitting for years with no cover). I've got her stripped down to the point where the engine and steering/throttle are pretty much the only things left on there, but will take those off when I refinish the hull. For now, she's sitting in the driveway on the trailer with a PVC-pipe skeleton supporting a Classic Accessories boat cover. I also discovered that an empty boat makes a great place to store extra junk (I'm a hoarder of materials and mechanical things and extra space is always evading me).

    First two pics are how she was sitting in the seller's back yard.
    Attached Images Attached Images    

  4. #4
    Join Date
    Jan 2011
    Location
    Mid-Atlantic, USA
    Posts
    1,220
    Post Thanks / Like

    Re: Aluminum Chris Craft Roamer refit project

    "Have you been keeping up with zeyang's aluminum boat build?"

    I just saw that recently. That's one big project.

    Duane, I first learned to weld steel in high school, back when they didn't assume everybody was going to college. I've had a Millermatic 35 in my garage since the early 1990s. My welds were never professional grade, but after an hour of practice or so I could lay a pretty good bead. I also owned a body shop back in the 1980s, and even though I mostly managed the business side of the shop I spent plenty of time recreating spot welds on unibody chassis, door skins etc. But that was all in steel.

    I got the TB280 because there's no 220VAC in the boatyard, and it was cheaper to buy a used one with a spoolgun than to have a mobile welder come out and do little spot jobs. I made that decision after a welder where the boat is now told me it would be $1,000 to fix a crack in a weld around a patch in the deck where there used to be a hole for the shorepower connection. The patch was a round plate 4" in diameter, and the crack in the weld went 75% around the perimeter. The guy who welded up the aft enclosure the first time also did the patch that ended up cracking. But $100/inch for somebody else to come in and fix the crack seemed pretty rich to me.

    I understand there are insurance costs, reasonable labor rates and help for fire watch, but $1000?

    Anyway, having never welded aluminum or used spray transfer before (though I read a lot about both here), I'm not really sure what to look or listen for. I've heard about the hiss, and I definitely heard a bunch of different sounds as I played with the settings on the TB280 and tried pushing, pulling, forward 2-back 1, steady and straight, C-shaped and every other technique I've ever used (on steel). I still don't know if I did any of them right.

    I spent hours searching online for pictures of short circuit aluminum welds vs spray transfer but didn't find anything. Maybe if I post a picture or two, you could tell me what you see.

    For example, three different people welded here. Did anybody do it right?


    Oh, and for what it's worth, I finally got an auto-darkening welding helmet. That thing is the bees knees! But I'm so trained to lift my helmet after each weld and snap my head to close it before starting the next one, I pretty much failed to take advantage of the auto-darkening feature. I suppose this is similar to somebody in the olden days who's used to horses and buggies and suddenly has to figure out how to make a car go. Snappin' the reins don't work!

    Cheers,
    Q

  5. #5
    Join Date
    Jan 2011
    Location
    Mid-Atlantic, USA
    Posts
    1,220
    Post Thanks / Like

    Re: Aluminum Chris Craft Roamer refit project

    The latest blog article on my 1969 Chris Craft Roamer 46 Refit involves Prepping the Aft Enclosure for Primer. Check it out!

    1969 Chris Craft Roamer 46 Refit: Prepping the Aluminum Aft Enclosure for Primer.

    Q


  6. #6
    Join Date
    Jan 2008
    Location
    Lansing, MI
    Posts
    6,117
    Post Thanks / Like

    Re: Aluminum Chris Craft Roamer refit project

    I gotta go back for an update.

    The first time I saw your blog, I spent over an hour looking thru it.

    Man, you have far more patience than I. The whole debacle with the title papers would have drove me insane.

    You got a great boat. I dunno if yours was built here in MIchigan, but they had several factories here, one of which we would drive by on the way to Lake Michigan when I was a kid.

  7. #7
    Join Date
    May 2008
    Location
    Orange, TX
    Posts
    18,081
    Post Thanks / Like

    Re: Aluminum Chris Craft Roamer refit project

    Quote Originally Posted by q240z View Post
    Anyway, having never welded aluminum or used spray transfer before (though I read a lot about both here), I'm not really sure what to look or listen for. I've heard about the hiss, and I definitely heard a bunch of different sounds as I played with the settings on the TB280 and tried pushing, pulling, forward 2-back 1, steady and straight, C-shaped and every other technique I've ever used (on steel). I still don't know if I did any of them right.
    Take a look at this video on the Miller site and I think it'll help more than anything I can attempt to explain here.

    http://www.youtube.com/v/V_MiGrL9350...toplay=1&rel=0

    You have to watch thru the machine connection and set up portions to get to the welding demonstration (~2 minutes). The travel speed in the video is real and not sped up to save video time so keep that in mind.


    Quote Originally Posted by q240z View Post
    I spent hours searching online for pictures of short circuit aluminum welds vs spray transfer but didn't find anything. Maybe if I post a picture or two, you could tell me what you see.

    For example, three different people welded here. Did anybody do it right?

    Proper aluminum MIG is done in spray so if one were to show the correct process in a video I would think that's how they would show it rather than in short circuit although I do see the point in making the comparison for the purpose of teaching the viewer the difference.

    Once you see the Miller video I think you'll agree that actually none of the examples in the photo are "right" although it looks as if the green and red samples approach correct in spots.
    MM200 w/Spoolmatic 1
    Syncrowave 180SD
    Bobcat 225G Plus - LP/NG
    MUTT Suitcase Wirefeeder
    WC-1S/Spoolmatic 1
    HF-251D-1
    PakMaster 100XL
    '68 Red Face Code #6633 project
    Star Jet 21-110

    Save Second Base!

  8. #8
    Join Date
    Jun 2012
    Location
    Big Lake/Monticello MN
    Posts
    15,402
    Post Thanks / Like

    Re: Aluminum Chris Craft Roamer refit project

    Here are some great arc shots of what aluminum spray transfer should look like:


    If I remember correctly this one shows the good and bad - lots of information on setting up:
    http://www.youtube.com/watch?feature...&v=8AT4cEHtMn8

    Dave J.
    Dave J.

    Beware of false knowledge; it is more dangerous than ignorance. ~George Bernard Shaw~

    Syncro 350
    Invertec v250-s
    Thermal Arc 161 and 300
    MM210
    Dialarc
    Tried being normal once, didn't take....I think it was a Tuesday.

  9. #9
    Join Date
    Jan 2011
    Location
    Mid-Atlantic, USA
    Posts
    1,220
    Post Thanks / Like

    Re: Aluminum Chris Craft Roamer refit project

    Quote Originally Posted by 7A749 View Post
    I gotta go back for an update.

    The first time I saw your blog, I spent over an hour looking thru it.

    Man, you have far more patience than I. The whole debacle with the title papers would have drove me insane.

    You got a great boat. I dunno if yours was built here in MIchigan, but they had several factories here, one of which we would drive by on the way to Lake Michigan when I was a kid.
    Trust me...that title problem DID make me just a wee bit nuts...for a while.

    Word has it mine was built in the Holland, Michigan factory but spent almost all of its life on the Chesapeake Bay and Potomac River...until 1985 or so, when she was hauled on land and stayed there until we found her in 2007. The boat's been drydocked far longer than she was in the water!
    Cheers,
    Q

  10. #10
    Join Date
    Jan 2011
    Location
    Mid-Atlantic, USA
    Posts
    1,220
    Post Thanks / Like

    Re: Aluminum Chris Craft Roamer refit project

    Quote Originally Posted by duaneb55 View Post
    Once you see the Miller video I think you'll agree that actually none of the examples in the photo are "right" although it looks as if the green and red samples approach correct in spots.
    Yea! I did the green one! I blame that fancy new helmet for making me go off the joint!

    I saw those videos before trying my hand at it. Since I had previously only welded steel, it took a while to figure out what works (sorta) with aluminum. What was maybe most surprising was how much better (not good...just better) the welds got when I moved the gun relatively quickly. While I was practicing, I tried to pull and, just like the video showed, the weld was black with carbon and quite pitted.

    From the video, it appears the biggest problem with short circuit welding of aluminum is spatter. I'm guessing there's more to it than that.

    Thanks,
    Q
    Last edited by q240z; 05-14-2013 at 10:27 AM.

  11. #11
    Join Date
    Jun 2012
    Location
    Big Lake/Monticello MN
    Posts
    15,402
    Post Thanks / Like

    Re: Aluminum Chris Craft Roamer refit project

    Just turn up your wire speed until it starts stubbing into the metal - now you are doing it wrong

    You will be in short-circuit mode and the weld will not look right

    Dave J.
    Dave J.

    Beware of false knowledge; it is more dangerous than ignorance. ~George Bernard Shaw~

    Syncro 350
    Invertec v250-s
    Thermal Arc 161 and 300
    MM210
    Dialarc
    Tried being normal once, didn't take....I think it was a Tuesday.

  12. #12
    Join Date
    Jan 2011
    Location
    Mid-Atlantic, USA
    Posts
    1,220
    Post Thanks / Like

    Re: Aluminum Chris Craft Roamer refit project

    HA! I think I tried that. It did, in fact, look wrong.
    When I went the other way, I ended up cleaning tips quite a bit.

    My latest blog article is on priming the decks. For only working on this on weekends, we're making great progress.

    1969 Chris Craft Roamer 46 Refit: Priming the Decks

    Q

    Last edited by q240z; 05-14-2013 at 10:35 AM.

  13. #13
    Join Date
    Jan 2011
    Location
    Mid-Atlantic, USA
    Posts
    1,220
    Post Thanks / Like

    Re: Aluminum Chris Craft Roamer refit project

    My latest blog is a big one...

    1969 Chris Craft Roamer 46 Refit: Prepping and Priming the Aft Enclosure

    That Awl Grip Max Cor aluminum primer is one funky color...and the smell!

    But with the aft deck primed, we're very close to doing the final prime coat. Then it's seven "paint days" to do the shiny AwlCraft 2000 from the top to the boot stripe.

    Cheers
    Q


  14. #14
    Join Date
    Jan 2008
    Location
    Lansing, MI
    Posts
    6,117
    Post Thanks / Like

    Re: Aluminum Chris Craft Roamer refit project

    It's an awesome project. Cool to hear yours was made in Holland.

    We would hit the beach almost every Sunday over the summer (before I went to vegas) & often go to Ottawa Beach in Holland. We would drive right by the Chris Craft plant on the way there.

    Have to go back & look at your latest progress.

  15. #15
    Join Date
    Oct 2010
    Location
    S.E. Michigan
    Posts
    555
    Post Thanks / Like

    Re: Aluminum Chris Craft Roamer refit project

    Interesting. Years ago, my wife and I had a Roamer. We had keel leaking issues it. It had to be pumped constantly or it would scuttle itself. Nice boat but then boats are like any toy. "A hole to pour money into". My present take on any boat is....."Better if someone else owns it" and I'm a guest. Much better investments out there that actually pay dividends instead of costing dividends.

    Have fun.

  16. #16
    Join Date
    Jan 2011
    Location
    Mid-Atlantic, USA
    Posts
    1,220
    Post Thanks / Like

    Re: Aluminum Chris Craft Roamer refit project

    SidecarFlip, let me guess--yours was steel? I say that because it seems the steel ones had more issues with rotting from the inside out.

    Boats are certainly not an investment in the conventional sense. Then again, I know people who spend far more on gadgets of the month, new cars every few years, watching sporting events and health care than I do on my boats. To each his own, I guess. For me, there are few places that can match the solitude of a boatyard in winter or the satisfaction I get from doing restorations on old Chris Crafts. Hell, in shrink bills alone I save bazzillions! ;-)

    My latest blog covers work from last weekend -- fillets & final touches on the aft deck enclosure.

    Cheers,

    Q


  17. #17
    Join Date
    Oct 2010
    Location
    S.E. Michigan
    Posts
    555
    Post Thanks / Like

    Re: Aluminum Chris Craft Roamer refit project

    T'was steel.... Being used to a snot hull and then a steel hull was an interesting change. Glass deadens the noise. Steel amplifies it.

    We went to a 43 foot Bertram with twin diesels and then got out of boats entirely. My boating days now are limited to my friend's Cigarette with triple 500 Mercrusiers. I chip in for gas and keep an eye on the throttles. No 'against the dash' stuff with me. His Cigarette will do an honest 100 mph firewalled. Issue is, it's an expensive 100 per. Most recreational hobbies are expensive (like my hunting trips). Thats the way it is. You gotta pay to play.

    I custom built the stainless drive showers for the outdrives last year and new remotes (fuel sending bulkheads) for the tanks.

    Boats are fun when you don't own them.

  18. #18
    Join Date
    Jan 2011
    Location
    Mid-Atlantic, USA
    Posts
    1,220
    Post Thanks / Like

    Re: Aluminum Chris Craft Roamer refit project

    Quote Originally Posted by SidecarFlip View Post
    T'was steel.... Being used to a snot hull and then a steel hull was an interesting change. Glass deadens the noise. Steel amplifies it.
    It's funny you mention that. We went from a Connie 52 in mahogany (god's hull material) to a Commander 42 (in snot) and MAN, I can't tell you how tough it was sleeping the first couple of weeks. Soooo noisy! But I also remember from when the Roamer was briefly splashed back in '09 that it sounded like I was inside a kettle drum.

    I figure I'll be so exhausted from the refit that I won't notice the racket.

    Cheers,
    Q

  19. #19
    Join Date
    Oct 2010
    Location
    S.E. Michigan
    Posts
    555
    Post Thanks / Like

    Re: Aluminum Chris Craft Roamer refit project

    I went from boats to long range precision shooting. Interestingly, like boats, synthetic stocks are referred to as snot stocks. Just as expensive a hobby btw.

    I think if I got back into the nautical hobby, it would be a Thistle Class wind boat with a diesel auxillary. Don't believe I could ever tack out of the marina.

  20. #20
    Join Date
    Jan 2011
    Location
    Mid-Atlantic, USA
    Posts
    1,220
    Post Thanks / Like

    Re: Aluminum Chris Craft Roamer refit project

    We've got the cabin top and dashboard primed in Awl Grip 545...the final prime coats before spraying the shiny. Check it out!

    1969 Chris Craft Roamer 46 Refit: Final Priming with Awl Grip 545!

    Cheers,

    Q

  21. #21
    Join Date
    Jan 2011
    Location
    Mid-Atlantic, USA
    Posts
    1,220
    Post Thanks / Like

    Re: Aluminum Chris Craft Roamer refit project

    Been out of the country for a couple of weeks, so the refit ground to a brief halt. Last weekend I'd shaken off enough of the jet-lag hangover to get to the boatyard and get some work/play done.

    Anyway, the African Mahogany toe rail is installed now and it's got fillets all around. Next up is shiny clear coat, then a teensy bit of primer on the fillets...then, painting the topsides! Unless something unexpected happens, we should start the final painting in two weekends.

    Check out the full story at 1969 Chris Craft Roamer 46 Refit: Installing the Mahogany Toe Rail

    Cheers,
    Q

  22. #22
    Join Date
    Jan 2011
    Location
    Mid-Atlantic, USA
    Posts
    1,220
    Post Thanks / Like

    Re: Aluminum Chris Craft Roamer refit project

    After a brief delay, we got shiny Imron MS1 on the toe/cap rail!

    1969 Chris Craft Roamer 46 Refit: “Shiny” on the Toe Rail

    I'm all giddy!

    Cheers,
    Q


  23. #23
    Join Date
    Jan 2011
    Location
    Mid-Atlantic, USA
    Posts
    1,220
    Post Thanks / Like

    Re: Aluminum Chris Craft Roamer refit project

    I was also wondering if I could get some expert opinions about the weld quality below. These new plates are blocking the hole where the exhaust used to exit the boat; we're relocating the exhaust to midships. The fellow who's doing the work is a marine mechanic who does reasonably nice TIG welds with the Snap-On machine in his shop. The welds here are the same guy using my Miller TB280 and Spoolmatic 30A. I know it's hard to diagnose from pix, but I'd appreciate learned opinions on what you can see here.

    Cheers,
    Q

    Last edited by q240z; 07-01-2013 at 05:00 PM.

  24. #24
    Join Date
    Apr 2013
    Location
    Marina del Rey
    Posts
    993
    Post Thanks / Like

    Re: Aluminum Chris Craft Roamer refit project

    Yuck!

  25. #25
    Join Date
    Jan 2011
    Location
    Mid-Atlantic, USA
    Posts
    1,220
    Post Thanks / Like

    Re: Aluminum Chris Craft Roamer refit project

    HA! Concise! I like it! lol

    Could you elaborate a bit, though? I think I see a crack along the top and it appears he was doing spot welds for most of the trip around. If they are unattractive but otherwise solid, I could maybe live with that. If unattractive = prone to failure, that's another issue.

    Cheers,
    Q

+ Reply to Thread

Quick Reply Quick Reply

Register Now

Please enter the name by which you would like to log-in and be known on this site.

Please enter a password for your user account. Note that passwords are case-sensitive.

Please enter a valid email address for yourself.

A) Welding/Fabrication Shop
B) Plant/Production Line
C) Infrastructure/Construction/Repair or Maintenance/Field Work
D) Distributor of Welding Supplies or Gases
E) College/School/University
F) Work Out of Home

A) Corporate Executive/Management
B) Operations Management
C) Engineering Management
D) Educator/Student
E) Retired
F) Hobbyist

Log-in

Posting Permissions

  • You may post new threads
  • You may post replies
  • You may not post attachments
  • You may not edit your posts
  •  
Page generated in 1,713,251,517.88591 seconds with 18 queries