
 Reply
ReplyNice!
Sent from my SAMSUNG-SM-G890A using Tapatalk


 WeldingWeb Foreman

Though the welding portion is the very tiniest part of the work, I wanted to share my most recent metal working project with you, and in appreciation for Wes teaching me how, and setting me up to tig weld.
At 72-years old, I'm only just now learning to be a machinist. Though I've used my ancient Index Super 55 mill to slot a couple holes and fish-mouth a couple tubes, this is my first complex fabrication done mostly on the mill, and entirely of my own design.
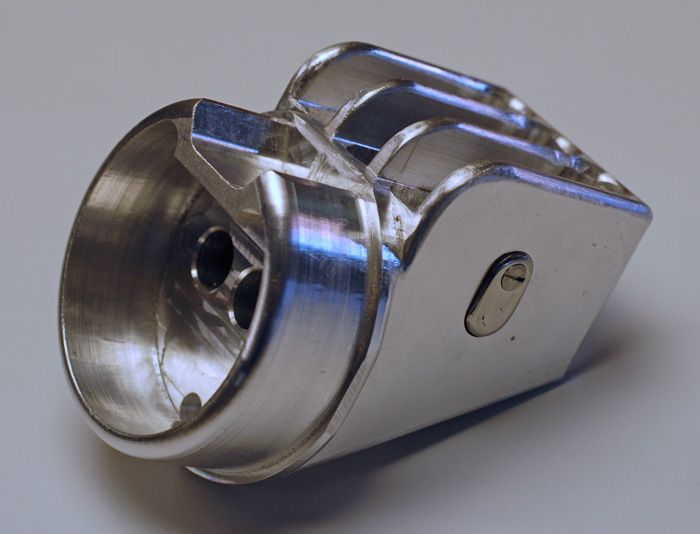
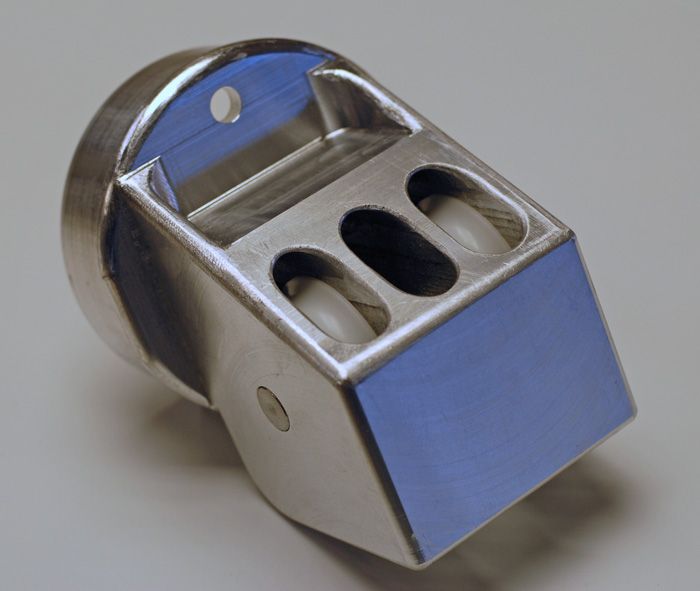
It is an aluminum boom end fitting for a 30' sailboat. Milled from a solid block of aluminum, the body's corners have been rounded over to minimize risk of personal injury and protect against line chafe. For scale, the odd rounded feature fits inside a thin-walled 4" OD boom. The 2" plastic sheaves were purchased (only 2 installed for photo)--everything else I fab'd, myself. Sheaves will handle out-hall plus 2 reef lines, which will be hidden inside boom.
The sheave axle is 1/2" stainless bar whose end I turned down on the lathe {my first ever use of a lathe) for a press fit in the stainless end cap, before tig welding (also just learning) and then shaping/polishing. The cap sits partially in a shallow, milled slot to prevent the shaft from turning. The screw only prevents the shaft from falling out. My weld was just two tacks, really, as I was concerned to not warp the precision shaft.
First I band-sawed a block of aluminum roughly to size, and fly-cut those surfaces. Then drilled 2 sets of (3) 5/8" holes intersecting each other. From the holes I milled the slots. Now switching to the rotary table, all the features that relate to the boom shape were produced.
Back off the rotary table, one of the large, flat sides was end-milled and fly-cut. The other side was fly-cut only (easier). While in this position, the axle hole was drilled and the axle cap slot milled. Now the large, angled cut-away section was band-sawed away and the large radius shaped on the top fins. Re-staging on the fins, the small pocket on the bottom was milled away to lighten. Lastly the tap drill for the retaining screw was drilled through the body and axle cap, and the cap then clearance-hole drilled and countersunk. Drain hole was drilled and the body tapped. Where practical, outside corner radii were machined using a radius end mill. The rest were mostly hand-filed.
The project really pointed out some shortcomings in my tooling/setup and especially in my fledgling technique. But, in spite of the many challenges and mistakes it filled me with satisfaction and pride to see this project unfold and almost surprise me that I had created it.
All comments welcome.
 WeldingWeb Foreman
Nice!
Sent from my SAMSUNG-SM-G890A using Tapatalk
LONGEVITY 250EX w/ 25' weldcraft cs310 torchTorchmate w/ Hypertherm powermax 85withFLASHCUT CNC PRO SERIES CONTROLS
WeldingWeb Tradesman
Wow at 70+ doing good, life experience at play too. Great looking piece there. keep it up. You might find out that you could do more than you ever dream of......
Klutch 220si mig , stick, and dc tig
Hobart 140
AHP ALPHA 200X 2016
Lotos LTP5000D
Smith O/P
 WeldingWeb Foreman
Beautiful work!
DB
 Master Welder
Damn, for someone who claims they don't really know too much about machining, you could have fooled me!!
Glad to hear the Index is running well. It's been awhile since we last talked.
Great job man!
WeldingWeb Foreman
Thanks fellas. Guess it's true that you're never too old to learn. My previous career in design engineering has provided useful experience for my 2nd career as a boat builder, which has been mostly custom woodworking.
WeldingWeb Apprentice
Wow, for someone who says the just started, that's awesome
WeldingWeb Tradesman
That looks awesome!
Forney C5 Arc Welder
Lincoln Idealarc 250-250 Ac/Dc Arc Welder
Miller Bobcat 225g Plus
Lincoln PowerMig 200
Forney O/A Rig
WeldingWeb Craftsman
what i had left as self esteem just went straight down the drainfirst time/first class!
thank's for sharing

Posting Permissions

