Reply
ReplyFigured that you guys will like this. Just finished this earlier today...


 WeldingWeb Foreman

Hey zank Jody on welding tips and tricks gave you a shout out. Here's the video
WillSupports Autism Awareness
My Toys
BobCat 225 PLus
Millermatic 130
Miller Spectrum 300 Cutmate
Everlast Power Tig 185 Micro
April is Autism Month .
WeldingWeb Tradesman
Figured that you guys will like this. Just finished this earlier today...
Motorboating...in the Cleavage of the Tetons
WeldingWeb Foreman
Still hot.
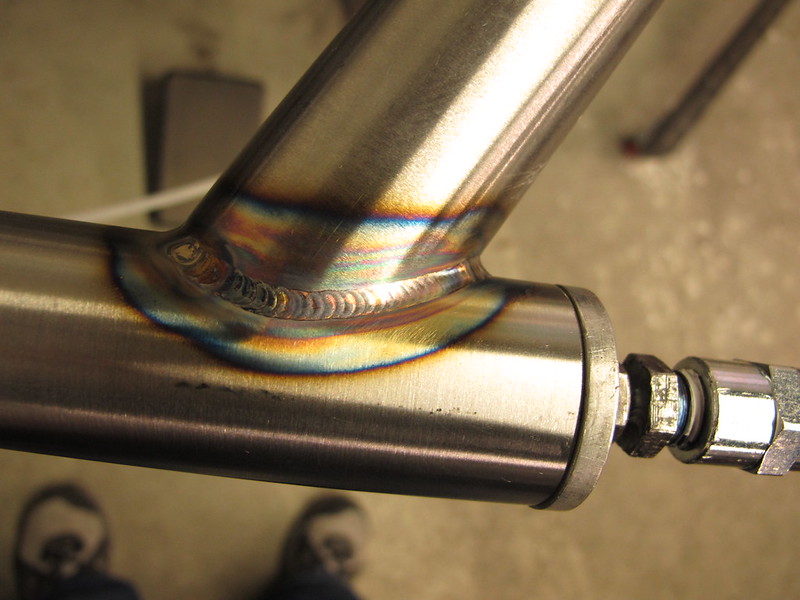
Mark O by Zanconato Custom Cycles, on Flickr
WeldingWeb Foreman
Mike, As always, gorgeous weld. Nice job.
That last photo sparks a couple of questions.
--Do you make an attempt to control the direction of the "stacks of dimes" on the weld? do you go all the way around the joint in the same direction, ending up with the last round 'dime' in the most non-visible location? (((((((((O(((((((((
--Isn't there enough room in the Anvil jig to weld complete joints, or is that strictly a tack up holding fixture?
--Zip
Last edited by zipzit; 04-13-2013 at 05:31 PM.
WeldingWeb Foreman
Thanks, LB. I do best going clockwise around the joint. I break the joint up into quadrants and do 10:30 to 1:30 and 4:30 to 7:30 first. I do this on the three joints (I leave the BB for last) of the frame. This helps keep the alignment pretty straight. In most cases, it's nearly the same as just tacked. Then I'll do the ears. Basically it pulls to the side you do second. So if I need to pull the DT/HT joint to the drive side, I'll do the non drive side ear first. All that said, each joint will have two stops, and I orient them off-axis at about 10:30 and 4:30.
I only tack in the fixture. The metal is going to do what it's going to do as it reacts to the heat. So I think it's best to weld it on the bench rather than constrain it in the jig. In terms of access, I could braze a whole joint in the jig, but I couldn't weld one in it. There just isn't enough room or line of sight for me.
Hope that helps. And I will take some pictures of the beer bottle drill this week.
WeldingWeb Tradesman
Wow, those welds are humbling. That is some hand-eye mastery.
Not nearly in the same league, but this is what I have been up to...
Here is the beginning of a whole new product line, using cogs tig welded together to create really unique, memorable items. I will be doing a lot with lights, including sconces, outdoor lighting, hotel/restaurant lighting, tea lights, and more. Here is a little taste of much, much more to come. This one can be hung, put on a table, mounted as a sconce, or used to throw incredible shadows. I haven't seen anyone doing exactly this. I will be adding fused and stained glass to the insets, check it out!
This is hung as a corner light, porch light, or sconce.
Here is the bottom (for on a table) or top (chandelier)
And here is a cute little tea light. I will be adding fused glass to the cogs. (it's not totally welded together yet)
The ladies are gonna dig this one by the bath...
MUCH more on the way
Motorboating...in the Cleavage of the Tetons
WeldingWeb Tradesman
Glass is next on the 'to learn' list.
I will be cutting and soldering the fused glass, that's not too hard.
Right now I am all about figuring out Tig!
Motorboating...in the Cleavage of the Tetons
 WeldingWeb Foreman
hi zank, here's some of my wet paint.. a couple of close-ups on fillet brazed frames, if you dont mind me posting in your thread
thermal arc 252i - millermatic 350P - miller XMT, cp300ts, 30a 22a feeders, buttload of other millers, handfull of lincolns, couple of esabs - Hypertherm 1250 G3
WeldingWeb Tradesman
Gary would approve.
Motorboating...in the Cleavage of the Tetons
WeldingWeb Foreman
Beautiful paint. And please post more. This thread is for everyone!
rideit, I love the disk rotor. Great touch. All of your stuff looks sweet.
 WeldingWeb Craftsman
Nice seat tube cluster! That colour change paint shows it off well.
SqWave 200
Millermatic 190
Airco 200 AC
Hypertherm PM45
Boice-Crane Band Saw
Victor O/A
WeldingWeb Foreman
Working on a run of road frames.
Road Team Seat Tubes by Zanconato Custom Cycles, on Flickr
Road Team Seat Tubes by Zanconato Custom Cycles, on Flickr
Road Team Seat Tubes by Zanconato Custom Cycles, on Flickr
Mark O by Zanconato Custom Cycles, on Flickr
Aaron B by Zanconato Custom Cycles, on Flickr
Stephen S by Zanconato Custom Cycles, on Flickr
David B by Zanconato Custom Cycles, on Flickr
WeldingWeb Tradesman
BEAUTIFUL!
Are you doing a 'sleeve' at the seatpost junction (seperate seat tube) for strength, or manufacture ease? (Matching ideal post size to tube set?)
I think I see why, but I would love to hear your take?
Motorboating...in the Cleavage of the Tetons
WeldingWeb Journeyman
Do you weld each chain link to keep the chain like that?Originally Posted by rideit

WeldingWeb Tradesman
Yup. Little Tig tack, four per 1" link. It's kind of time consuming, but everyone asks about it, so it's pretty unique.
Motorboating...in the Cleavage of the Tetons
WeldingWeb Foreman
Nice touch on the seat tube zank. I wonder why most manufacturers don't do this (outside from cost and extra work of course but we are talking expensive frames anyway).
I have seen way too many frames crack in that area
WeldingWeb Foreman
Exactly. I used to epoxy in a composite shim, but have gotten away from that. The welded-in extension serves three purposes.
1) it allows me to use a 27.2 mm seatpost with a 31.8 mm seat tube. I hate forcing customers into an oddball post size.
2) it really beefs up that area, especially at the bottom of the slot and relief hole.
3) it makes doing a repair a lot easier than trying to remove a shim that has been bonded in with 3M DP420.
And it's only about 25 grams heavier overall. It's more work, but I like it better.
WeldingWeb Journeyman
Nice work. Do you finish your bikes with components?
If so, do you buy them retail or have you found a wholesaler that will sell to frame builders who do not have a retail store?
Thanks
WeldingWeb Foreman
As many complete bikes as I can. Yes, the big wholesalers will work with framebuilders, but we have to put together a pretty good case without a store front.
 WeldingWeb Tradesman
Here's a bike I built about 4 years ago. It was a fun little project. Wish I wouldn't have sold it.....
Miller Dynasty 200
Millermatic 211
Instagram?.... find me @ WELD_MEDIC
WeldingWeb Apprentice
Do you guys have trouble with the threads after welding. I noticed the welds were close to the crank threads.
WeldingWeb Foreman
I have some bronze heatsinks really cut down on the distortion of the bottom bracket shell, seat tube, and head tube. I can usually still thread a BB in by hand after welding.
WeldingWeb Foreman
Back from powdercoat.
Aaron B by Zanconato Custom Cycles, on Flickr
Aaron B by Zanconato Custom Cycles, on Flickr
Aaron B by Zanconato Custom Cycles, on Flickr
Aaron B by Zanconato Custom Cycles, on Flickr
WeldingWeb Craftsman
Mere mortals have to chase the threads a bit. Nice work Zank
SqWave 200
Millermatic 190
Airco 200 AC
Hypertherm PM45
Boice-Crane Band Saw
Victor O/A
WeldingWeb Journeyman
Close up please.