Reply
ReplyThanks Reebs.
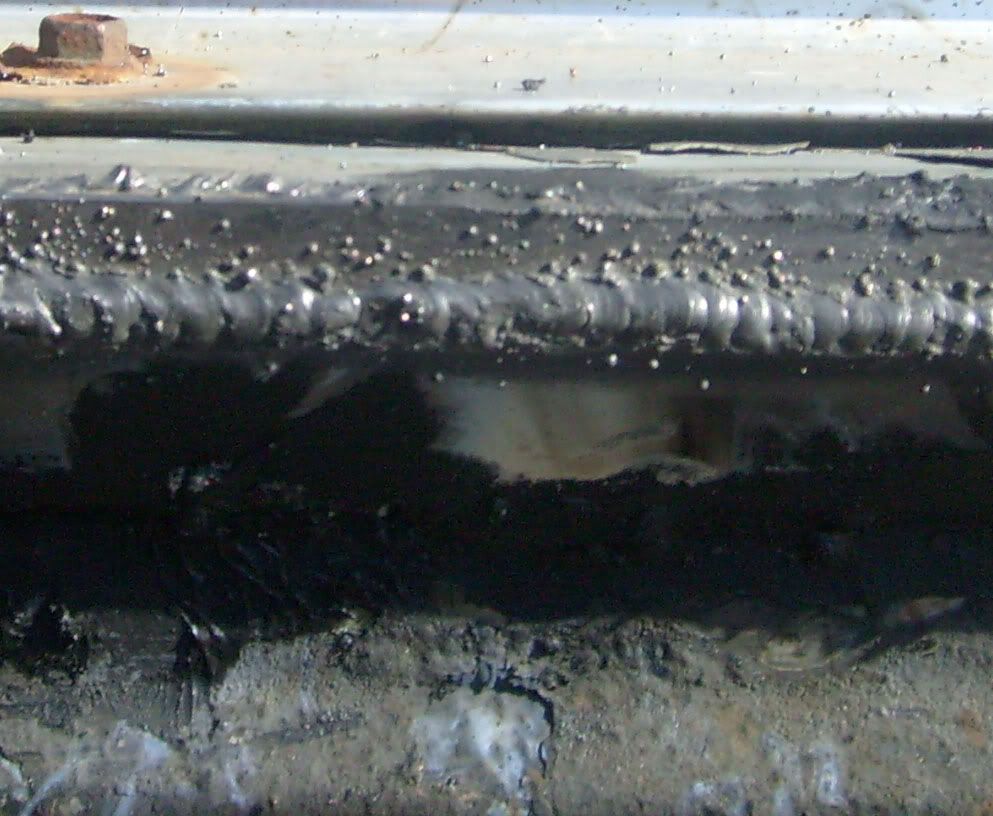
Here's a pic of a scrap piece of tubing that I welded to some .125" plate. The tube is 1.75"x.120" DOM mild steel.
I used my Lincoln PowerMIG with .030" ER70S-6, C25 gas @ 15cfh.


 WeldingWeb Craftsman

ZFab
My wife hates it when I call here in to look at something on the compter. She really liked your work on the axel housing. I'm greeeeeeeeeeeeen with enzy.
 WeldingWeb Artisan
Thanks Reebs.
Here's a pic of a scrap piece of tubing that I welded to some .125" plate. The tube is 1.75"x.120" DOM mild steel.
I used my Lincoln PowerMIG with .030" ER70S-6, C25 gas @ 15cfh.
WeldingWeb Craftsman
You are amazing!
 WeldingWeb Foreman
Afternoon Rex,Originally Posted by rode2rouen

You asked for pointers, so I will give you some...
As to my background, I am Lincoln Lover... One of my favourite shop models is the Invertec V-350 Pro, but have been using PM 300's and PM 350 MP's for the last two years or so. I think my "Frankenstein" Mig Cart is on here somewhere.... It is my intention to tweak what you have been doing to get you where you want to be, and better enjoying your Lincoln product.
First off, your settings are WAY OFF. Voltage is too high for that low of wire feed speed on a PM 300.
Go over to the Synergic (11) setting for a minute and dial down your WFS until you get to 16.5 Volts, What do you get? 175 Inches Per Minute, which is substantially more than what you are attempting to use. I would suggest that you use this new WFS number as a starting point and then fine tune to your preference.
You will NOT get a decent weld profile out of the settings you are currently using.
I use the Non-Synergic (5) mode quite a bit as well, as I am rather fussy, and don't always agree with Lincoln just "Throwing the wire" at the weld pool, but it might be helpful to go over to the Synergic (11) mode and write down the recommended WFS for various voltages (16.5 Volts through to about 28.5 Volts in 0.5 Volt increments) and use these as a rough starting point in the Non-Synergic (05) mode.
I use 16.5 Volts & 175 WFS quite a bit when if fits the application. It is an easily controlled setting for both weld quality and appearance. Try doing a 3F (Vertical Fillet weld) with any of your setting posted above, and see what your end up with... Then try the previously mentioned 16.5 V/175 WFS and see (and HEAR) the difference.
Now if I may, one minor correction, and yes, it IS splitting hairs a tad, but the coupons that you prepared are not arranged in an "Open Groove" joint configuration, or any groove weld as is normally referred to by Groove Weld classifications for plate (1G, 2G, 3G, 4G)... What you have prepared is a very simple "Open" Corner joint.
If you can remember acronyms, there are 5 Joint configurations: "BCTEL"
Bevel (All the "Groove" welds)
Corner (Several variations from Closed to Open)
Tee (All of the Fillet welds)
Edge
Lap
Here comes my $.02 on this thread:
Honestly, this whole "Mig Like Tig" thing is both disturbing and somewhat ridiculous to me...
Mig (or GMAW) is meant to look like Mig (or GMAW) and Tig (or GTAW) is meant to look like Tig (or GTAW)... By that, I mean that if your prepare your joints correctly, and you weld correctly (Paying attention to the metal - ensuring proper fusion through while maintaining puddle control) your welds will look like whatever process you used.
Mig (or GMAW) has different visual characteristics than Tig (or GTAW) because the obviously are very different processes. With Tig (or GTAW) you have the ability to weld Autogenously (No added filler) if you like....It depends on the application.
It will be a real shame if some newcomers come to this thread, and get so wrapped up in making Mig (or GMAW) LOOK like Tig (or GTAW) that they miss the whole point, and make poor welds that lead to eventual failure, and cause injury or loss.
1) Prepare your materials properly.
2) Concentrate on the weld process you are using
3) Make strong, sound, proper weldments
4) Develop your technique, and make them pretty AFTER.
I have been an admirer of Paul (ZTFab) for a long time... He is an INCREDIBLE Craftsman, both in his welding and his fabrication. I have told him so on many, many occasions, and it is good that you choose him to fashion your skills after, or use him as the benchmark of what you would aspire to be. He is, as I have said - "Incredible"
But what most of you fail to realize is that Paul's level of skill does NOT come overnight... He will have thousands of hours under a hood developing his technique. From his background, he makes welds that people's live's have depended on, in various Motorsports, so he learned how to make strong weldments.
Are his welds "Textbook" welds? Some may say yes, others may say no... But both would agree that he has very definite, and easily recognizable "Signature" Welds.
It is great that you all appreciate the visual appearance, but that is secondary to the actual strength of the weldment.
I'm climbing off the soap box now... Just felt it had to be said.
Later,
Jason
WeldingWeb Artisan
Jason,
Thanks for the compliments and thank you for stating the things that definitely need to be addressed.
I have said the same thing for years as this technique does draw criticism as well as admiration. There are basics of welding that must be established and perfected before aesthetic techniques can be applied.
The technique(s) that I use can provide very sound welds but, as you stated, in the hands of an inexperienced weldor can yield detrimental results.
For those who don't know, Jason (Black Wolf) is a very accomplished and skilled weldor and has many years experience. He speaks the truth and has the skill set to back it up.
 Master Welder
OK, I 'll throw in my $.02. Its just a looks thing and obviously some are really good at it. This thread was started because of another thread was going well then got way off track. I started a new one.
NOWHERE does it or I say all mig welds should look like this. There is a lot of interest in making mig welds as pretty as ZTfab does, so I am trying to let the information out.
I just weld. Some come out looking better than others. The pic of my welds posted earlier are of just jobs. I was not trying to make em look any different. I have said it many times. " I don't need no stinkin dimes" I saw an interest and started the thread. I have also said if you want it to look like TIG, then get out the TIG torch and have at it.
This thread is here to let the information flow.
David
Real world weldin.
When I grow up I want to be a tig weldor.
WeldingWeb Apprentice
I have to chime in here. I have been welding for about 9 years now and have ALWAYS ran my GMAW welds in a "push" fashion with the exception of flux core or dual shield wire, in which case I use the drag method for obvious reasons. I am certified in both hard wire stainless MIG and dual shield steel for structural welding. But in no way am I saying I am an excellent weldor. I have seen some "certified" weldors make some welds that just plain scare the living daylights out of me,
Anyway the point of all this nonsense is to say that I am not a "newbie" to this welding process as I can make some MIG welds like the best of them. But ever since I have been welding I have ALWAYS been taught to tilt the gun in the direction of travel and always PUSH hard wire and never ever drag it (unless flux core or dual shield is being used). I have been told that pulling doesn't get quite the penetration and the tie in at the toe of the welds like dual shield and flux core do. So in NO way am I discrediting ZTFab or anyone using this method. Its very apparent that his welds are both beautiful to the eye and to the aspects of a proper weldment. Im begining to wonder, have I been mislead this entire time? Can you make a pull weld as strong as a push weld? I would tend to think not as the preheating of the push method would aid in penetration but maybe Im wrong because of the way I have been taught. Im asking because I want to expand my welding knowledge as there is no such thing as knowing too much. Especially if it has to do with my job and how I put food on the table. Thanks!
Last edited by JDWeld; 05-31-2009 at 08:14 PM.
Master Welder
JDWeld, I disagree. Pull gets more penetration than push. Look in the books.
Pull (backhand) is for a deeper narrowed bead and push is the opposite. Both can be done with mig depending on the situation. I may have to do a test.....
************************************************** ************************************************** *******
Copied from here http://www.esabna.com/EUWeb/MIG_handbook/592mig7_8.htm
Torch position has a slightly greater effect than does welding voltage or arc travel speed. The effect of changing the longitudinal torch angle, or switching from a forehand to backhand welding technique is shown in Figure 7-10. It can be seen that generally the forehand welding technique yields shallower penetration than does the backhand technique. Maximum weld penetration is achieved with a torch angle of 25 deg. and the backhand welding technique. However, beyond this degree of torch angle, arc instability and spatter will increase. For very thin materials or where low penetration is required, a forehand technique is generally used.
************************************************** ************************************************** *********
I am not saying you are doing it wrong. I use both methods. I have a 3G Mig unlimited thickness cert. I used push to take the (vertical up) test........
A test would be fine with me in another thread. I will participate.
Black wolf, I Use a V350 with the advanced panel. OMGWHATAMACHINE!
David
Last edited by David R; 05-31-2009 at 08:28 PM.
Real world weldin.
When I grow up I want to be a tig weldor.
Master Welder
In regards to the push/pull issue only this gif at the bottom is borrowed from Miller and Hobart.
Supoorting info is as follows.
http://www.hobartwelders.com/elearning/#mig
http://www.millerwelds.com/resources...tips/MIG_tips/
Or:
"When using the GMAW process on light gauge material,
weld from right to left (if you are right handed).
This results in a colder weld and has less tendency for
burn through."
From;
http://content.lincolnelectric.com/p...im/LTW1TRI.pdf
Also:
http://www.millerwelds.com/pdf/mig_handbook.pdf
And
http://www.hobartwelders.com/elearni...lding_Tips.pdf
Perhaps this post belongs in another thread as well. Don't wish to detract from this thread.
Last edited by Sandy; 05-31-2009 at 09:00 PM.
WeldingWeb Apprentice
David R. I too would be willing to try both on a different machine(s) and a few different thickness for the sake of educational purposes. We have an old work horse Pow-Con and Miller 251's in the shop. This is a real eye opener to me. All these years I have been taught wrong by people I would consider some of the best welders I have ever met. (and I have met alot of them) To anyone else feel free to do the same thing and post your findings. Pictures would be great. But we will start this in another thread so we can get back to topic in this thread. Thanks David R, ZTFab and everyone else. I look forward to our own findings and results.
 WeldingWeb Tradesman
Thanx, Jason!!
I'll be cutting some more coupons today.....
I spent the weekend cutting brush and small weed trees in the back yard. Too bad an O/A torch won't work for that type of stuff.
Rex
 WeldingWeb Craftsman
Please stay out Willy Mac.
To all other members here, please to feed the animals as they wont ever leave afterwards.
Miller DVI2
Lincoln Precision Tig 225
Thermodynamics Cutmaster 38
Everything else needed.
Master Welder
It seems we were invaded by a member posting false information. The posts were deleted and all posts related to it. The member is in the penalty box....
David
Real world weldin.
When I grow up I want to be a tig weldor.
WeldingWeb Artisan
Thanks for getting that handled David.
Here are some more sample pieces that I did in the shop tonight....BUT, I did these with a different technique to show that my normal methods are not the only way to weld.
I appreciate all of the positive comments about my welding, however my techniques are definitely not the only way to get things done.
This is .188" CRS and set as an open corner joint. .030" ER70S-6 wire, C25 gas on my Lincoln PowerMIG 200.
The last pic is an inside corner joint.
These are a little rough since I don't really ever use this technique.

WeldingWeb Foreman
ZTFab
WeldingWeb Craftsman
Man, that is an understatement for sure. WeldingWeb Artist would be more accurate.
Gordie -- "I believe you understand what you think I said, but I'm not sure you realize that what you heard is not what I meant."
 WeldingWeb Foreman
Well Paul, no matter what you do, you sure got a steady hand. I am usually too low or too high or upside down or something and I just can't get that steady. I doubt I could be that steady on a small piece on the welding table let alone on real jobs.
Great work.
WeldingWeb Artisan
Thanks Nitesky but like most of the people on this site, I am just a weldor.
Thanks Bob. You'll get it with practice.
Master Welder
ZTfab, what wire speed and volts?
come on spill it!
Nice looking stuff.
David
Real world weldin.
When I grow up I want to be a tig weldor.
WeldingWeb Artisan
Sorry....details, details,
It was at voltage tap "C" and wire speed was at 325 on the dial.
This was on my Lincoln PowerMIG 200.
WeldingWeb Journeyman
Since David asked for pictures, I took one and decided to join the conversation.
I spent all day today with short-arc mig. Took three pics with my cell phone while on my lunch break, one of those pics didn't end up blurry. When I'm laying down a bead I'm not trying to achieve a psudo-tig appearance. I am oscillating the puddle for two reasons; first is to ensure that both toes are tied in by getting the arc out on each leg. Second is because I find it very difficult to make a weld with consistent size and profile if I'm not oscillating, counting each oscillation to maintain a rhythm. The oscillation pattern I used for the weld in the picture was ovals, or oval like loops. Joint is a flare bevel, welded with a drag angle. Elsewhere on the part are welds I made downhill in the same joint configuration have a different appearance (flatter and smoother), as position dictated a different technique.
Last edited by Static-XJ; 06-02-2009 at 09:39 PM.
 WeldingWeb Apprentice
hey , guys , while we're on the subject, how close do the rest of you follow the reccomendations for wfs & amps on the "door settings" of you're machines. i always struggle trying to find the "sweet spot" on all my machines. dont get me wrong , the welds look good and , i've never had any real problems with the strength of the welds, but they in no way look anywhere near as good as say a "ZT weld". not trying to hijack the thread, just thought it may be on topic. if not , just say & i'll start another thread . thanks")
WeldingWeb Artisan
The first thing I do is take that sticker and peel it off!!
Not really but I might as well. For example the last weld that I posted was done on .188" CRS and the settings were tap voltage "C" and 325 WFS.....the "recommended" setting on the door sticker for that is voltage tap "F" and 350 WFS.
Will that recommended setting work? I'm sure that it could if I wanted to weld while I was running. I run a slow hand speed and tend to slow everything down accordingly.
There are definitely parameters for welding that should be followed but I still believe that almost every person will need different settings depending on technique, comfort, and experience.
I would suggest that you use the settings on the door as a loose guideline and the fine tune them for your hand speed and comfort while making sure you are laying down a proper weld.
Last edited by ZTFab; 06-03-2009 at 11:29 PM.
WeldingWeb Craftsman
I have relatively little mig welding experience and lots of tig. I would like to make some points about tig that might change your views of the asthetics of certain welds.
The reason most tig welds have that ridged, "stacked dimes" look is because it's easier. You stop the advancment and then the filler, thats what makes the ridges. To make a perfectly smooth and correct weld is really hard. you would almost need a machine to feed the filler metal for you, sound familiar?
The look can be achevied several different ways, and if the apperance is important (it's almost always important to a tig welder's pride), a good welder will make sure to take their time to make a good weld, and hopefully the apperance takes care of itself.
 WeldingWeb Journeyman
So i tried the "e" pattern
Mine:
the left side was my 1st attempt the right i turned up the wire speed a shade.
I'm really sorry... but you guys are so awesome i had to try.
Here learning to turn down the Suck...
 WeldingWeb Apprentice
Primarily for the outside corners is what I was thinking about. The ones that Bob used in his thread to get this all going. Thanks
maniak
Posting Permissions