-
Re: Blacksmithing and forging
I don't know about that... losing your marbles is one thing... smashing the good crystal could lead to other problems...
250 amp Miller DialArc AC/DC Stick
F-225 amp Forney AC Stick
230 amp Sears AC Stick
Lincoln 180C MIG
Vevor MIG 200A
Victor Medalist 350 O/A
Vevor Cut 50 Plasma
Les
-
-
Post Thanks / Like - 1 Likes, 0 Dislikes
-
Blacksmithing and forging

Originally Posted by
Bruce

I wonder if another type glass ball might behave differently, maybe a crystal of some sort?
Those wands look sweet!
I doubt a higher quality marble would help. Heating the marbles slowly before exposing them to the hot steel should help. An easier solution might be to try marbles made out of Pyrex. I dont know the chemistry behind it, but Pyrex has a very low thermal expansion so it handles differential heating well. There was at least one guy selling colorful hand made Pyrex marbles on eBay.
https://www.ebay.com/itm/Handmade-Gl....m46890.l49292
Sent from my iPhone using Tapatalk
Last edited by ccogg; 03-07-2021 at 11:15 PM.
-
Post Thanks / Like - 3 Likes, 0 Dislikes
-
Re: Blacksmithing and forging
In full disclosure, I did have to cheat a little on the wands with marbles.
I cut the prongs using the portaband then put the wands in the forge to open them up. I tried to hammer the prongs to shape them to remove the sharp edges and thin them out a bit more. The prongs were so thin, they lost heat in seconds. Add in my mediocre hammer control and it wasn't working.
I ultimately spread the prongs out then had to grind the prongs to the shape I wanted. Then back in the forge to curve them. I used my homemade scrolling tongs (modified needle nose pliers) to get three of them to the correct shape. As mentioned, I used a stainless sphere as a mold and that held up to the heat and hammering. I shaped the base of the fourth prong until the marble just barely fit inside while leaving the tip mostly straight.
I let the prongs cool most of the way and then inserted the marble. I then had to use the OA rosebud to pinpoint heat sections of the fourth prong to shape it.
That method seemed to work the best for me.
Millermatic 252 MIG
Miller Dynasty 200DX TIG
Altas 12x36 Metal Lathe
Bridgeport Milling Machine
Arclight Dynamics 4x8 plasma table
www.psacustomcreations.com
-
Post Thanks / Like - 2 Likes, 0 Dislikes
-
Re: Blacksmithing and forging
Try something like this for the spheres

https://lextec.com/product/super-cold-134a-285g
Sent from my iPhone using Tapatalk
:
-
Post Thanks / Like - 3 Likes, 0 Dislikes
-
Re: Blacksmithing and forging
-60 in a can.... do they export that out of Manitoba?
250 amp Miller DialArc AC/DC Stick
F-225 amp Forney AC Stick
230 amp Sears AC Stick
Lincoln 180C MIG
Vevor MIG 200A
Victor Medalist 350 O/A
Vevor Cut 50 Plasma
Les
-
Post Thanks / Like - 1 Likes, 0 Dislikes
-
Re: Blacksmithing and forging
Any of that canned air (for blowing out keyboards and such) is the same thing and much cheaper. Just hold the can upside down when spraying.
Yeswelder MIG-205DS
(3) Angle Grinders at the Ready
Just a hobbyist trying to improve
-
Post Thanks / Like - 1 Likes, 0 Dislikes
-
Re: Blacksmithing and forging
Here is a dogwood branch that was partially hot worked or forged. Some parts were cold worked.


Sent from my SM-G930V using Tapatalk
Millermatic 252 MIG
Miller Dynasty 200DX TIG
Altas 12x36 Metal Lathe
Bridgeport Milling Machine
Arclight Dynamics 4x8 plasma table
www.psacustomcreations.com
-
Post Thanks / Like - 7 Likes, 0 Dislikes
-
Re: Blacksmithing and forging
You know if you make that any more realistic you're going to have to water it.... looks great!
250 amp Miller DialArc AC/DC Stick
F-225 amp Forney AC Stick
230 amp Sears AC Stick
Lincoln 180C MIG
Vevor MIG 200A
Victor Medalist 350 O/A
Vevor Cut 50 Plasma
Les
-
Post Thanks / Like - 3 Likes, 0 Dislikes
-
Re: Blacksmithing and forging
Great job! The dogwoods look so realistic.
-
Post Thanks / Like - 2 Likes, 0 Dislikes
-
Re: Blacksmithing and forging
Another dogwood branch is complete but I decided to paint this one.
Let me know if you like the painted or unpainted better.


Millermatic 252 MIG
Miller Dynasty 200DX TIG
Altas 12x36 Metal Lathe
Bridgeport Milling Machine
Arclight Dynamics 4x8 plasma table
www.psacustomcreations.com
-
Post Thanks / Like - 5 Likes, 0 Dislikes
-
Re: Blacksmithing and forging
Wow, they're both spectacular. I'm partial to the unpainted, the missus loves the painted one.
Nice work!
Yeswelder MIG-205DS
(3) Angle Grinders at the Ready
Just a hobbyist trying to improve
-
Post Thanks / Like - 1 Likes, 0 Dislikes
-
Re: Blacksmithing and forging
I like the painted myself. Looks great! I can’t help but wonder if there are some Chinese variants floating around in a dollar store somewhere. Sure makes it hard to compete with Chinese built crafts at times.
Lincoln, ESAB, Thermal Dynamics, Victor, Miller, Dewalt, Makita, Kalamzoo. Hand tools, power tools, welding and cutting tools.
-
Post Thanks / Like - 3 Likes, 0 Dislikes
-
-
Post Thanks / Like - 5 Likes, 0 Dislikes
-
Re: Blacksmithing and forging
Originally Posted by
psacustomcreations
Another dogwood branch is complete but I decided to paint this one.
Let me know if you like the painted or unpainted better.
I don't know which one I like best. I've been back and forth on this. That being aid I think you should sell them as a set.
-
Post Thanks / Like - 1 Likes, 0 Dislikes
-
Re: Blacksmithing and forging
Originally Posted by
psacustomcreations
]
Well that didn't last long. The painted one sold as soon to a guy that used to work for me in the Army as I posted it on Facebook.
Millermatic 252 MIG
Miller Dynasty 200DX TIG
Altas 12x36 Metal Lathe
Bridgeport Milling Machine
Arclight Dynamics 4x8 plasma table
www.psacustomcreations.com
-
Post Thanks / Like - 4 Likes, 0 Dislikes
-
Re: Blacksmithing and forging
Well that was fast and speaks volumes for what imo the majority of buyers will desire.
Last edited by N2 Welding; 03-14-2021 at 10:38 PM.
Lincoln, ESAB, Thermal Dynamics, Victor, Miller, Dewalt, Makita, Kalamzoo. Hand tools, power tools, welding and cutting tools.
-
Post Thanks / Like - 1 Likes, 0 Dislikes
-
Re: Blacksmithing and forging
I like(d) the painted one better.....
-
Post Thanks / Like - 2 Likes, 0 Dislikes
-
Re: Blacksmithing and forging
Damn... everyone is being so creative here... lol, makes the wooden car I built with my grandson little pretty pale in comparison. Being on a welding site, I want to say I like the unpainted version better... but having been a painter, you just did a fine job on that and it looks really good.
Shooter... the rocky spikes look great too...
250 amp Miller DialArc AC/DC Stick
F-225 amp Forney AC Stick
230 amp Sears AC Stick
Lincoln 180C MIG
Vevor MIG 200A
Victor Medalist 350 O/A
Vevor Cut 50 Plasma
Les
-
Post Thanks / Like - 3 Likes, 0 Dislikes
-
Re: Blacksmithing and forging
Originally Posted by
Shootr
Today's project is a surprise anniversary gift for the missus. Our 12th was last weekend and we spent it in Sedona where we got married. I picked a couple rocks from the spot on the trail where the ceremony was to use for this.
Started with a couple spikes and a cutout oval I had laying around.

I cleaned them up, split the spikes down the center a bit, and forged them into antler-looking holders.

At the last minute I thought a twist wouldn't hurt. I remembered to twist each one in the opposite direction, but didn't pay attention to where I clamped the first one so the twists still don't match.
I heated and pounded the plate to give it texture, and domed it up a little as well. Plug welded the spikes to it, and called it a day.


She seems quite pleased.

I like the textured plate. Good call on the plug welds. Im definitely a fan whenever its doable. 
Sent from my iPad using Tapatalk
:
-
Post Thanks / Like - 1 Likes, 0 Dislikes
-
Re: Blacksmithing and forging
No way I can decide on Pats dogwood branches. I too go back and forth.
They would probably sell well here in BC as they are the provinces floral emblem.
Sent from my iPad using Tapatalk
:
-
Post Thanks / Like - 2 Likes, 0 Dislikes
-
Re: Blacksmithing and forging
Originally Posted by
Lis2323
I like the textured plate. Good call on the plug welds. I’m definitely a fan whenever it’s doable.
Sent from my iPad using Tapatalk
I have to thank Pat for the textured plate idea - he just did one and it added so much to his piece.
The plug weld idea is one (of so so many) lessons I've been taught since joining this forum.
Yeswelder MIG-205DS
(3) Angle Grinders at the Ready
Just a hobbyist trying to improve
-
Re: Blacksmithing and forging
Originally Posted by
Lis2323
No way I can decide on Pats dogwood branches. I too go back and forth.
They would probably sell well here in BC as they are the provinces floral emblem.
Sent from my iPad using Tapatalk
The dogwood is also the official flower of my state (Virginia)
Sent from my SM-G930V using Tapatalk
Millermatic 252 MIG
Miller Dynasty 200DX TIG
Altas 12x36 Metal Lathe
Bridgeport Milling Machine
Arclight Dynamics 4x8 plasma table
www.psacustomcreations.com
-
Post Thanks / Like - 2 Likes, 0 Dislikes
-
Re: Blacksmithing and forging
Thought I'd copy this over from IFI where I posted it initially.
Carving Letters in Iron......
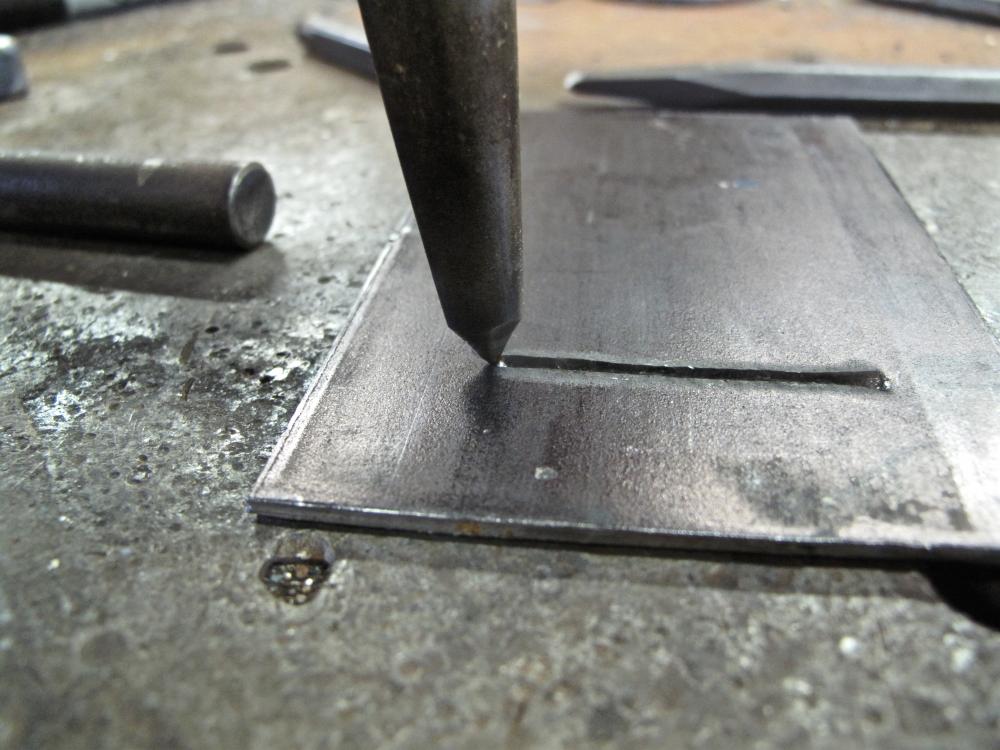
I use a light hammer that weighs just shy of a pound. A light hammer doesnt fatigue you and maximizes your control. Remember, while we are technically cutting through the steel, we want to do it in a controlled manner that gives us the results were looking for. A big whallop with a ten-pound sledge will certainly make a dent in the metal, but maybe its not the best option.
For chisels, I prefer to keep things simple. Aside from my center punch, I use three chisels to carve the letters -- including curved lines like you see in the hearts and latin characters. You dont need a curved chisel to make curved lines, odd as that might sound.
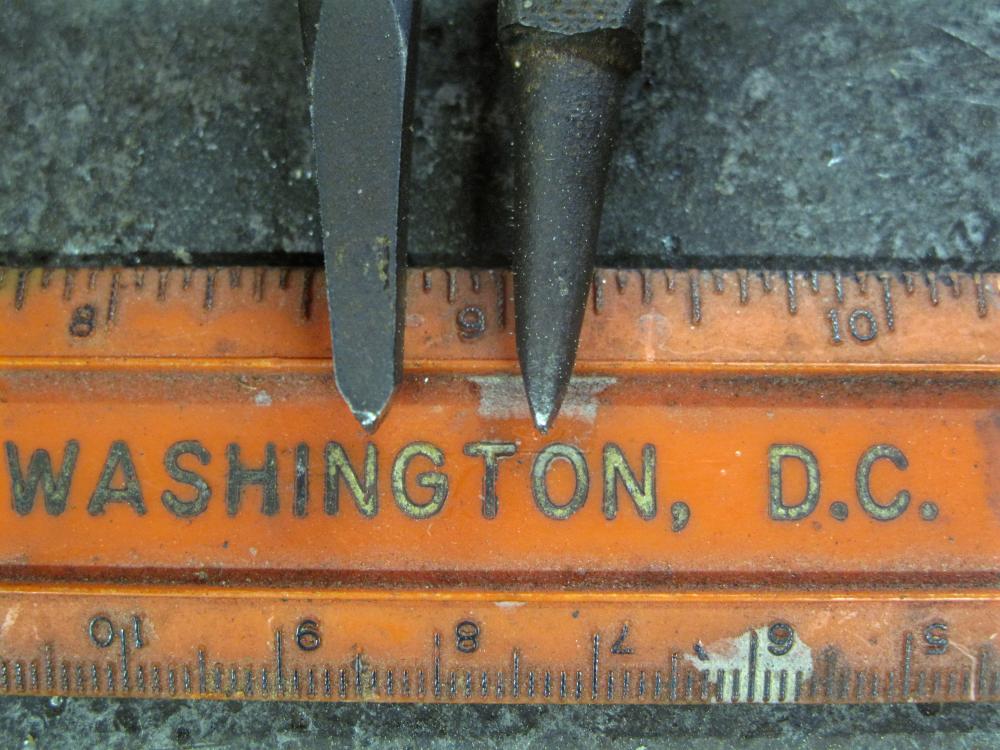
My big chisel started life as a roller bearing. I left the heat treat as-is and simply ground it to an angle thats somewhere under 90º. Its a fat angle and youll find that a light tap with the hammer doesnt make much of a mark in the steel. This is exactly what we want.
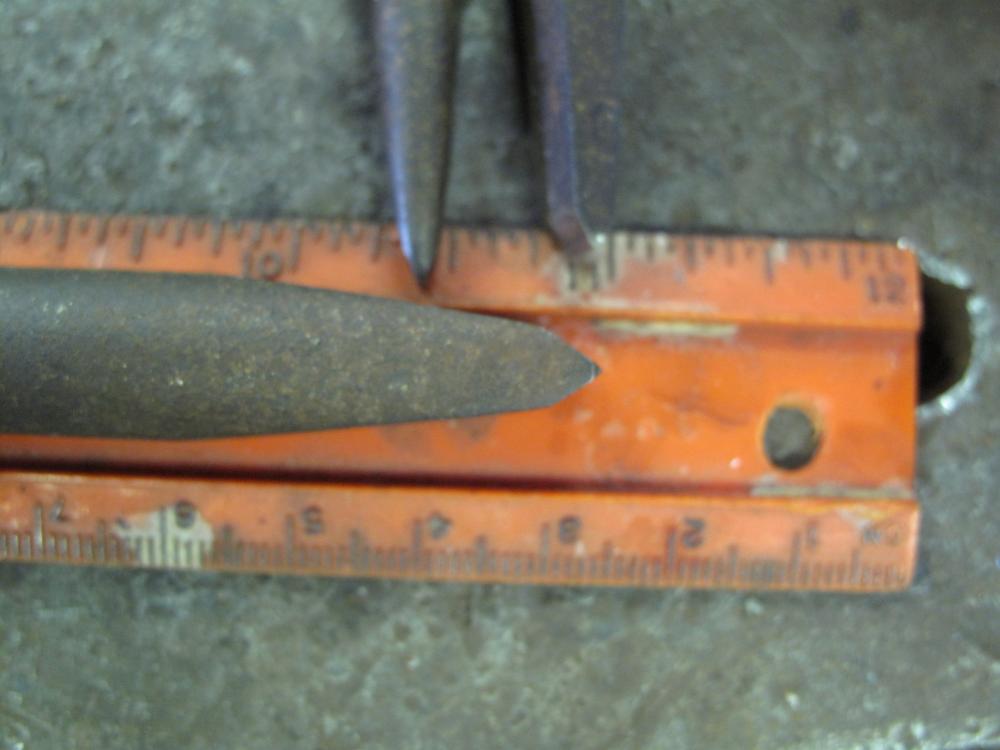
Chisel #2 was a ⅜ cold chisel that I ground down to a fat ¼ and gave a sharper angle to the bevel grind.
The Third Chisel started out as a carpenters nail set and has the finest grind of the three. The edge is also slightly rounded.
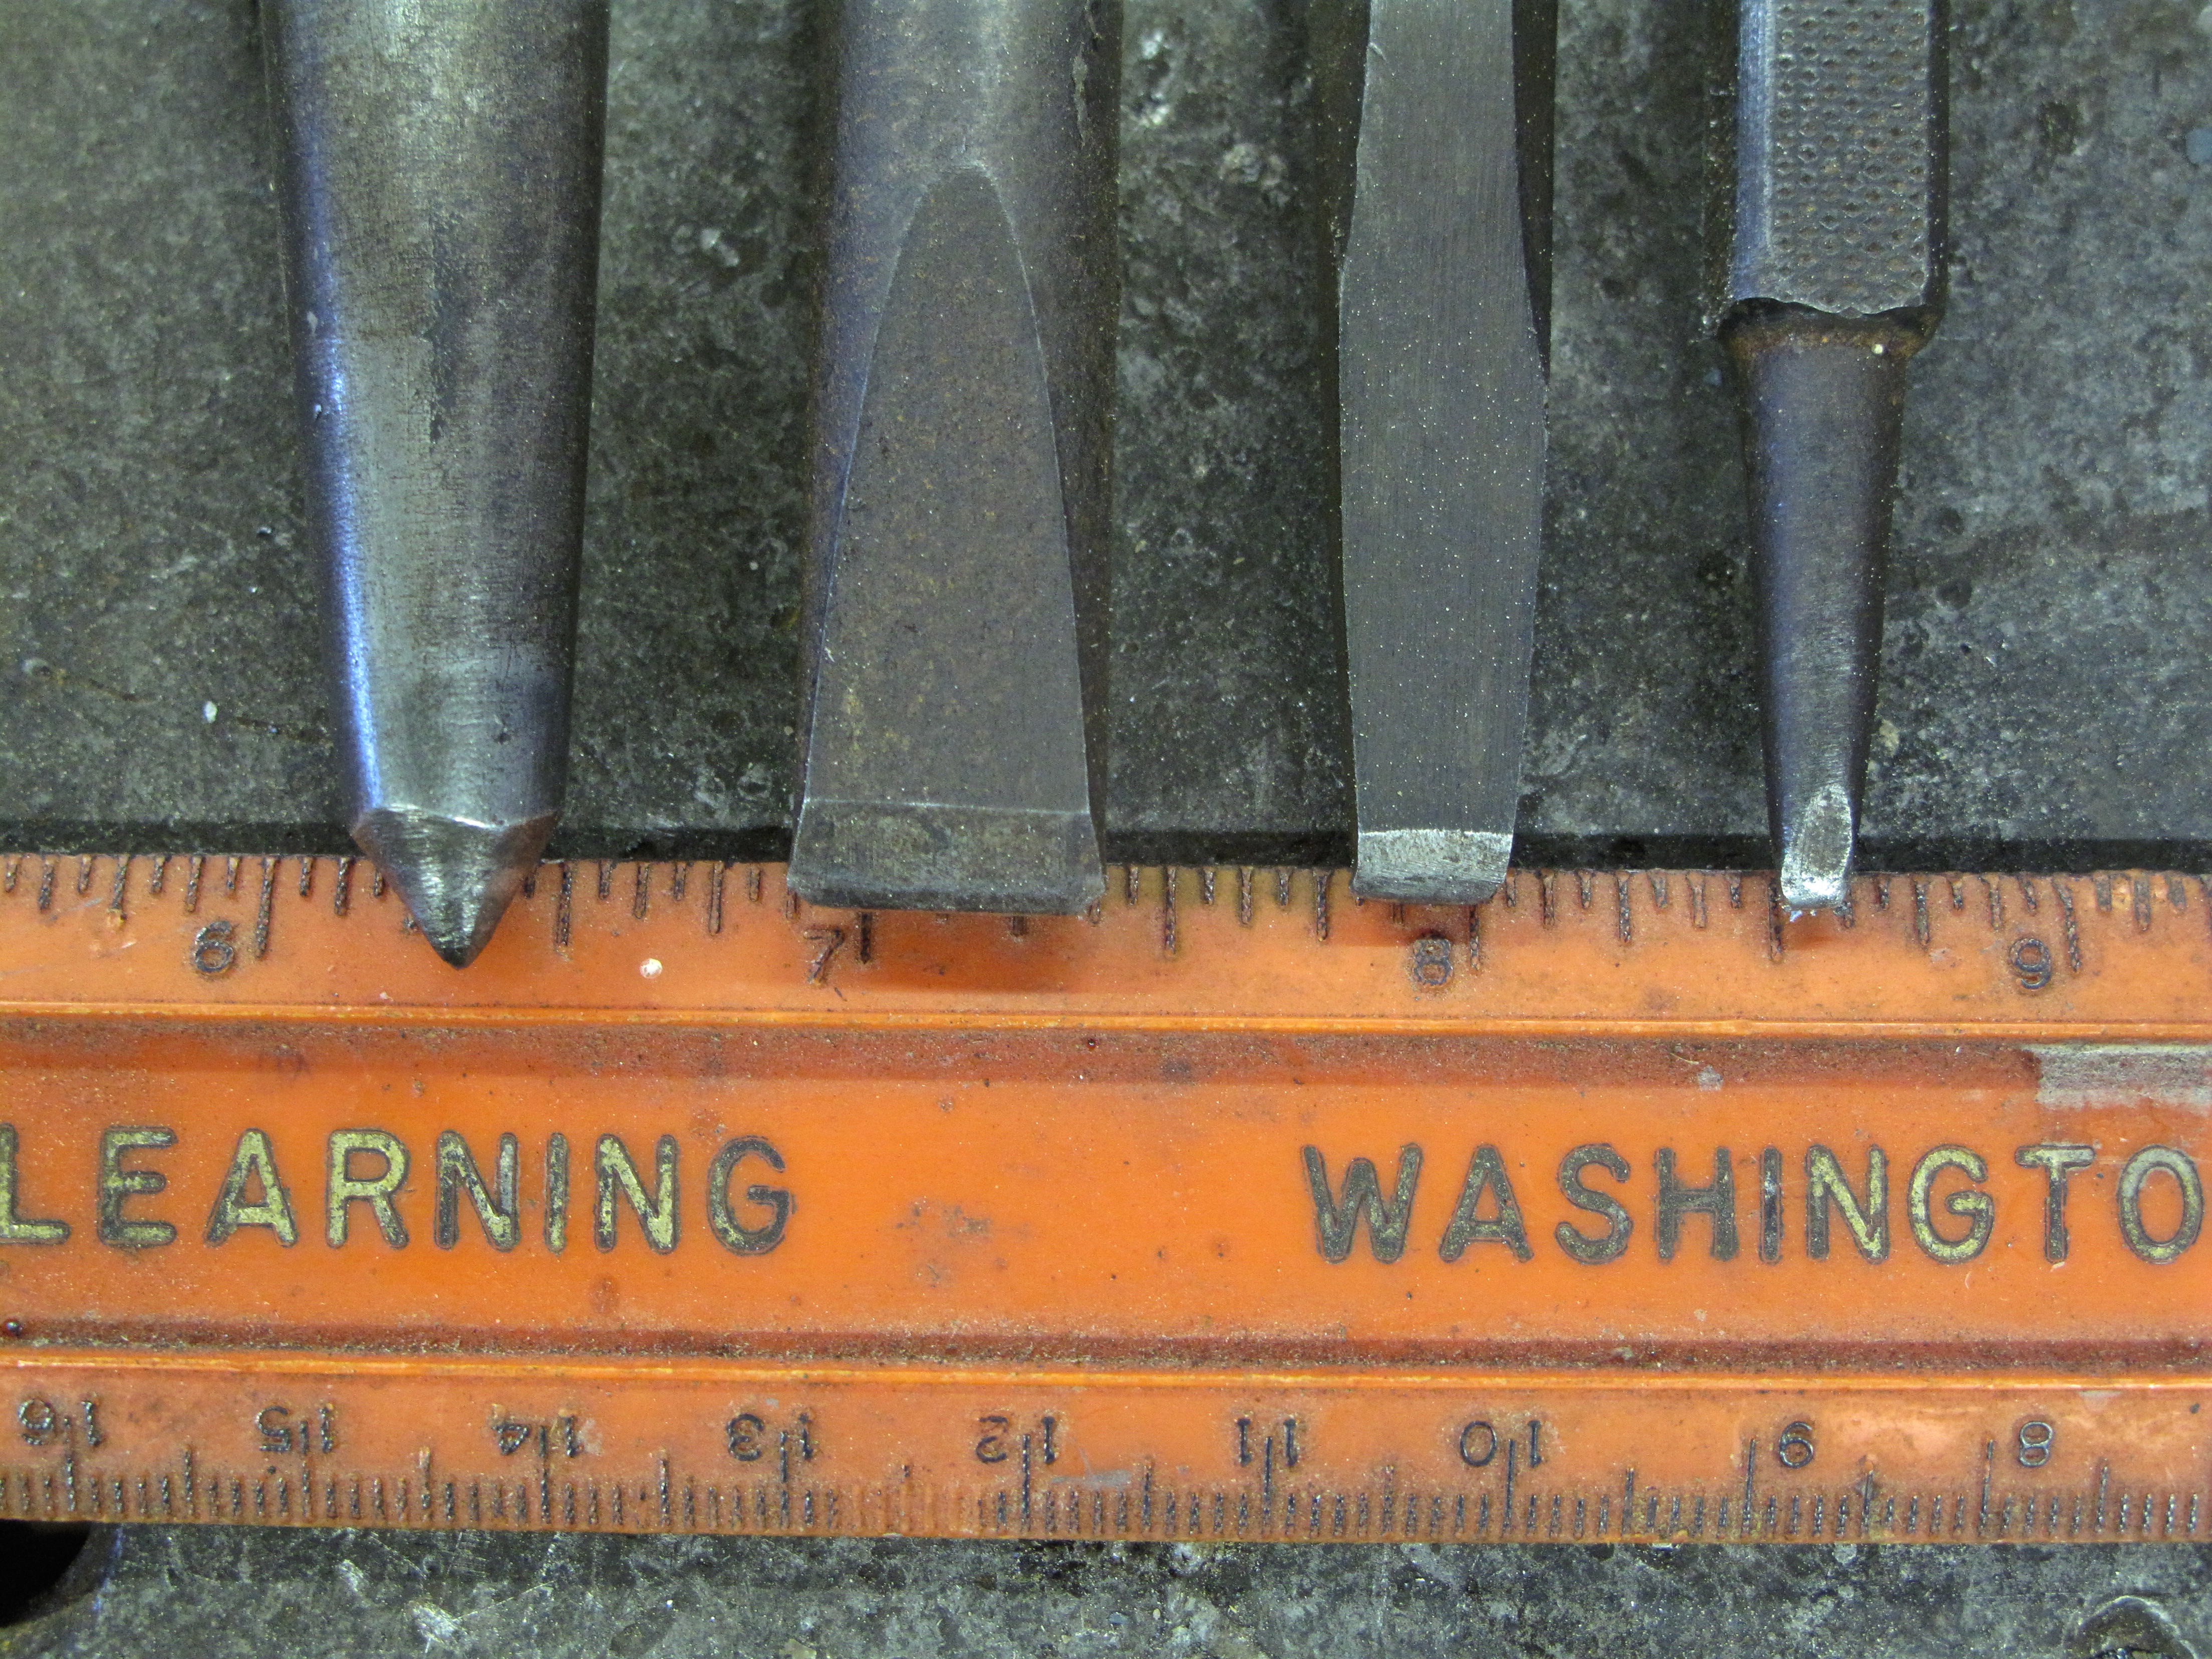
The key to remember is that you dont want a long edge on the chisels because that distributes the force of the hammer strike over a greater surface area and diminishes the penetration you get. It seems reasonable to have chisel edges that are as long as the letter you want to carve, but doing that means you need a heavier hammer, harder strike and have less control over the process.
With the chisels ground to shape, look at your work bench.
If you have a lightweight wood bench or a metal layout table with a top thats less than an inch thick -- pull a chair up to your anvil and use that instead. Ive made many a pendant while sitting at the anvil and its quite comfortable. A few welding magnets will help contain the tools so they dont bounce all over while youre working.
Okay, now for the hard stuff
..
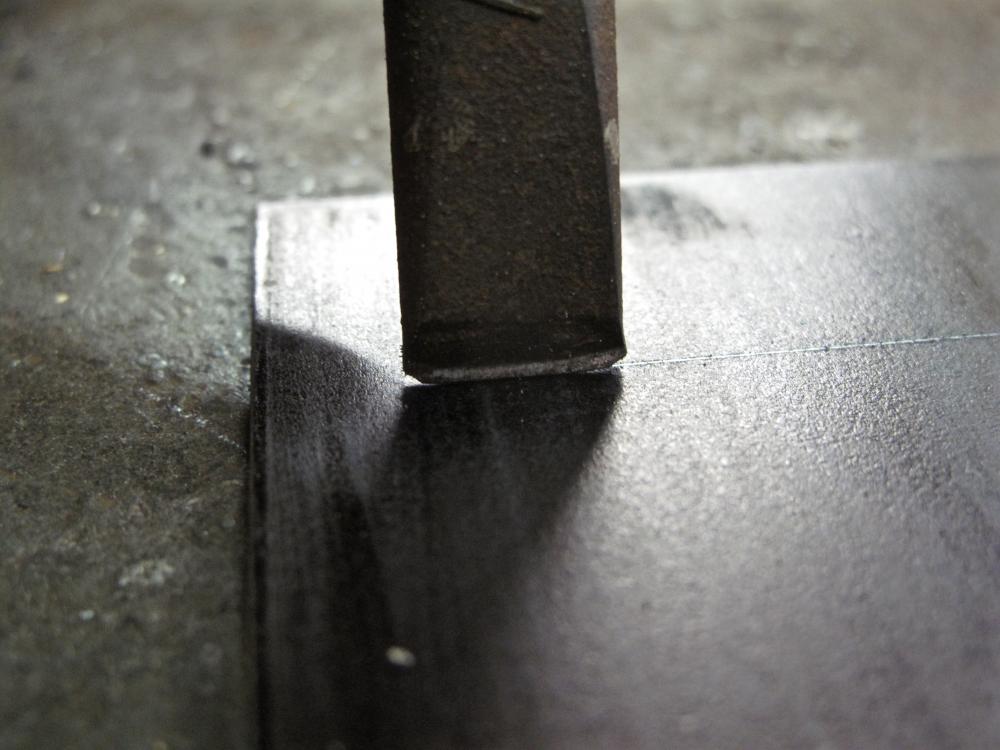
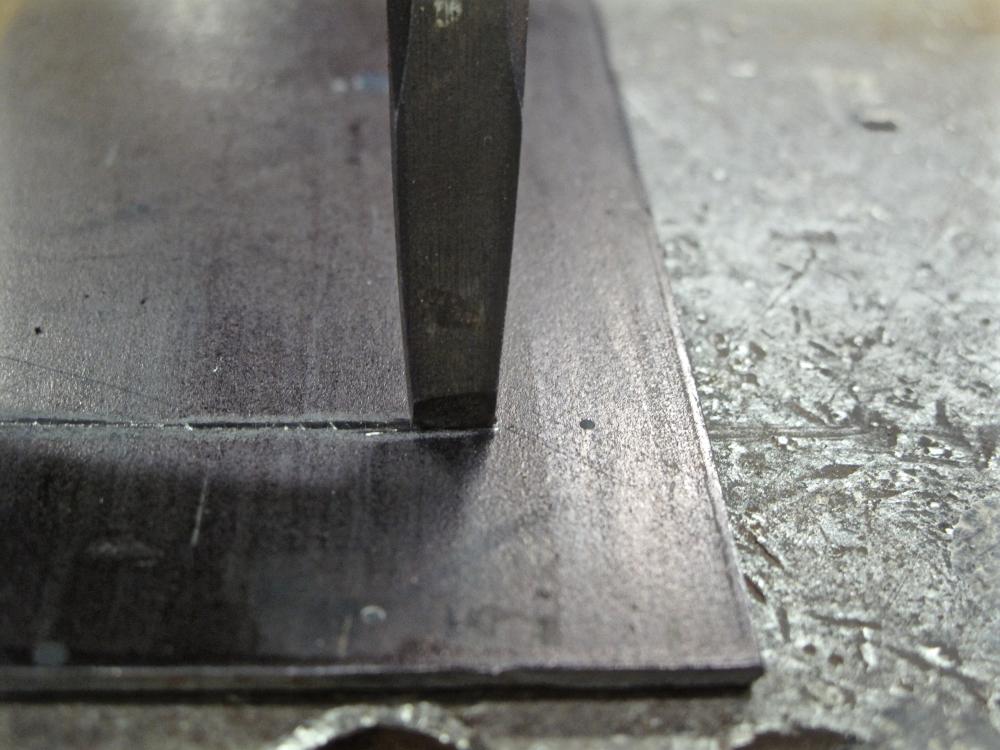
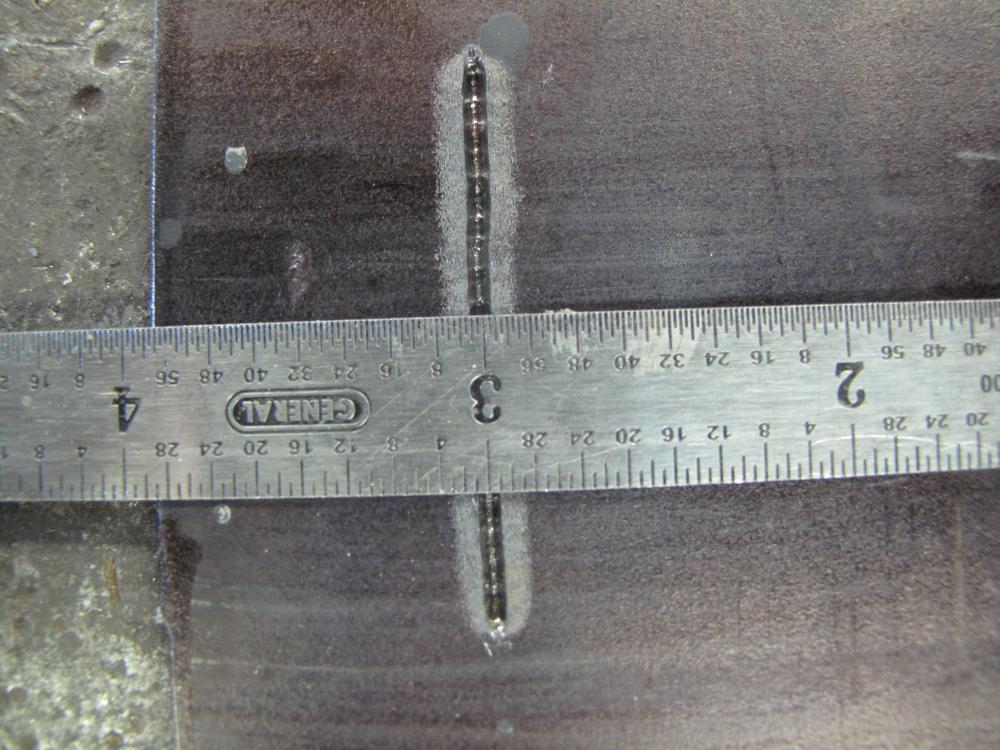
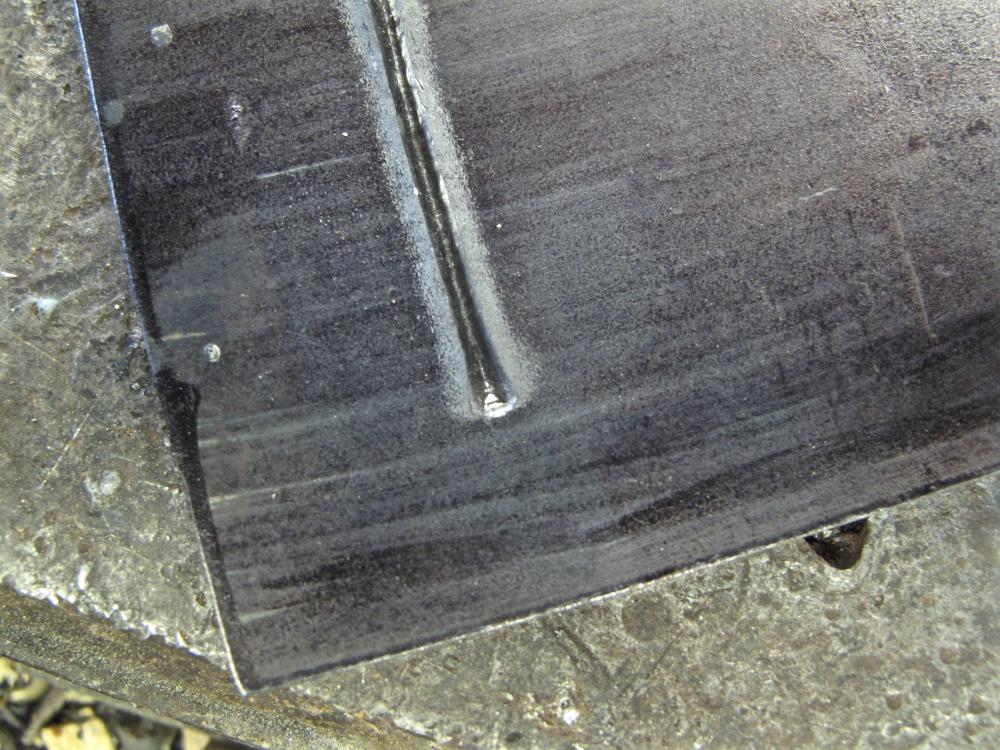
Step 1: Scribe a line on your practice piece. In this case Im using ⅛ mild steel that Ive coated with magic marker to help with the photographing. I dont usually bother with coloring the metal since Im right there up close and personal with it.
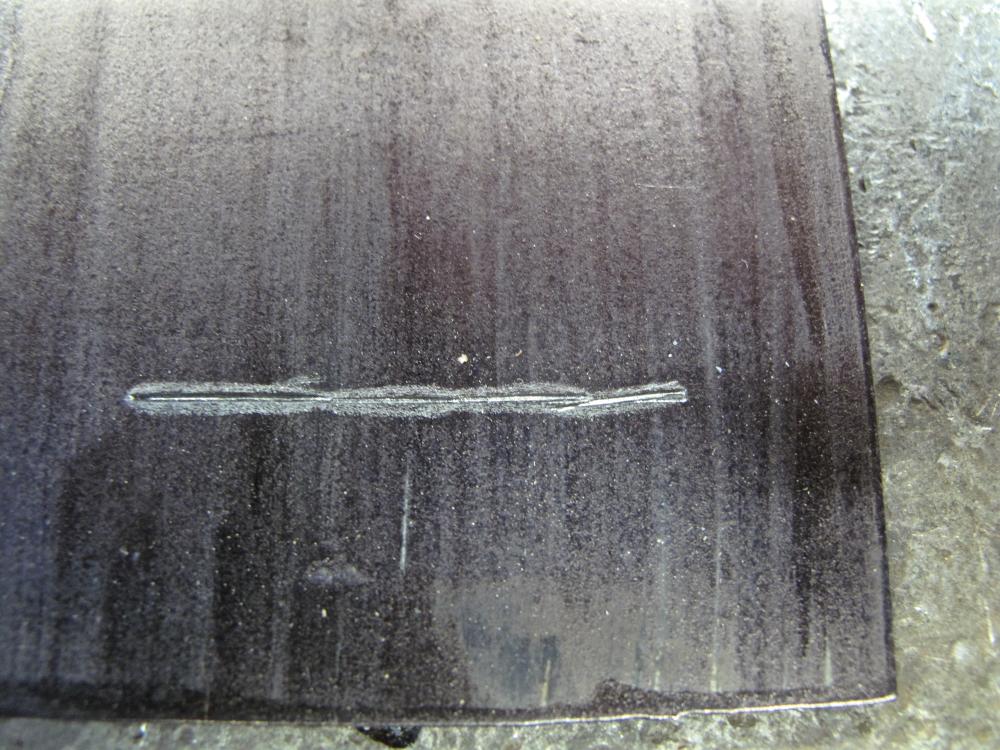
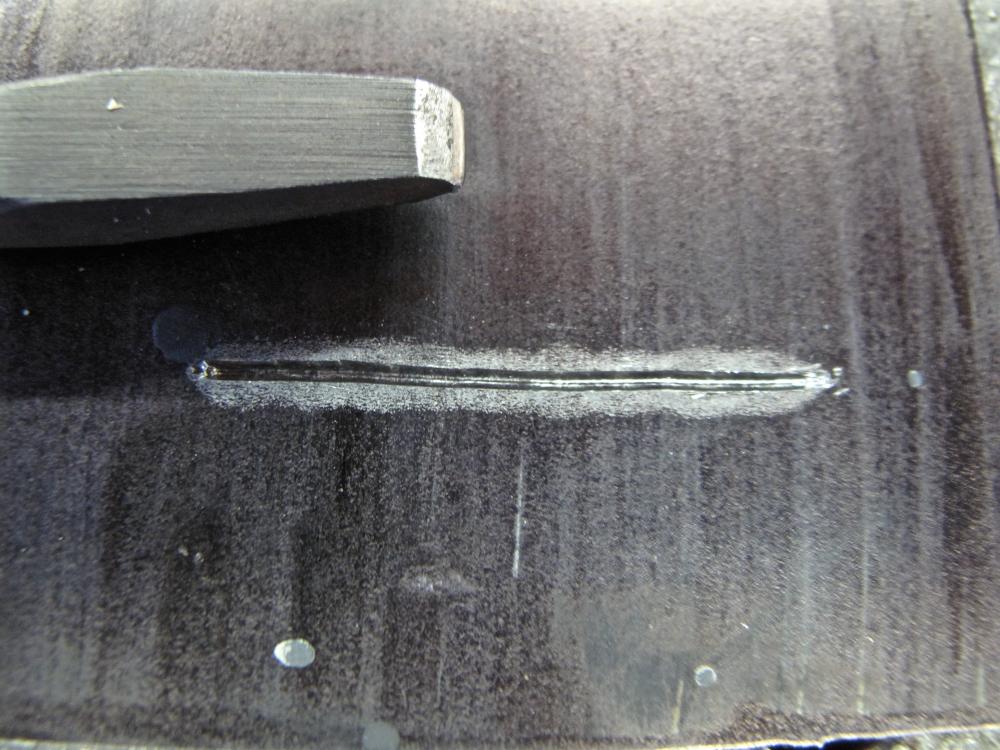
Step 2: Start with your ½ chisel and lightly tap it into the metal. All youre trying to do is deepen the scribed line so you can better feel it with your chisels.
One tap, then move down an edge-length.....
-
Post Thanks / Like - 2 Likes, 0 Dislikes
-
Re: Blacksmithing and forging
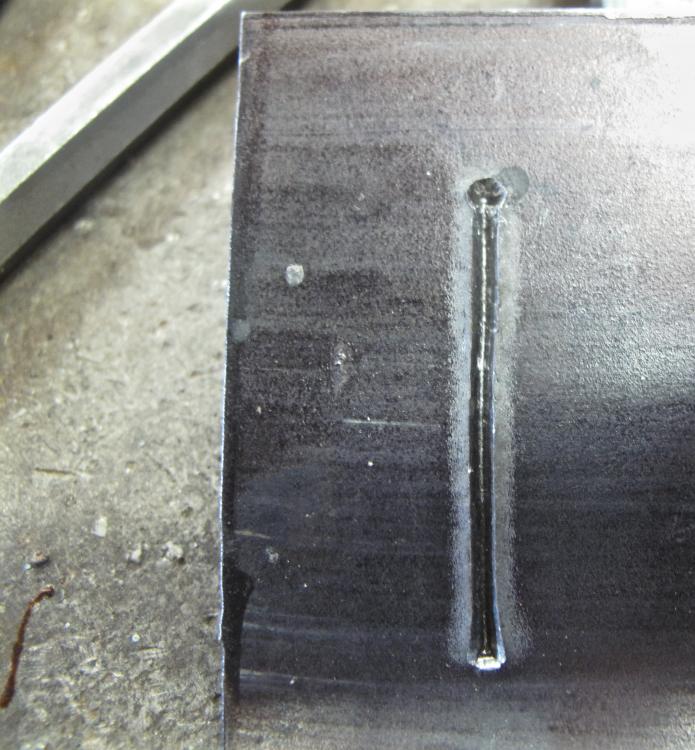
Carving Letters in Iron....
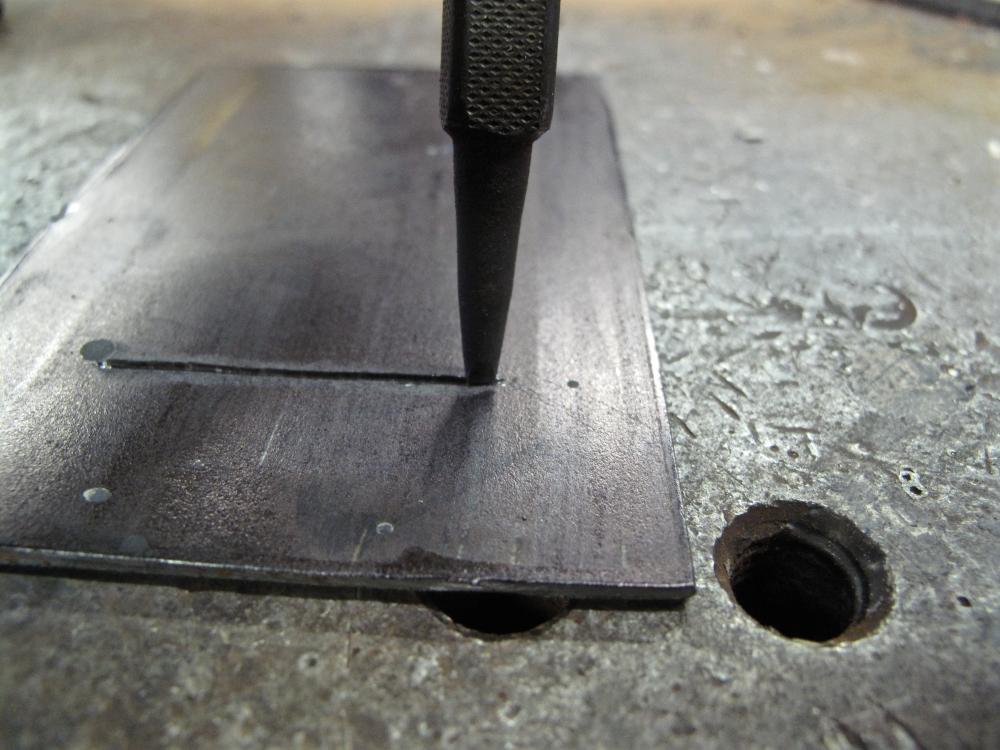
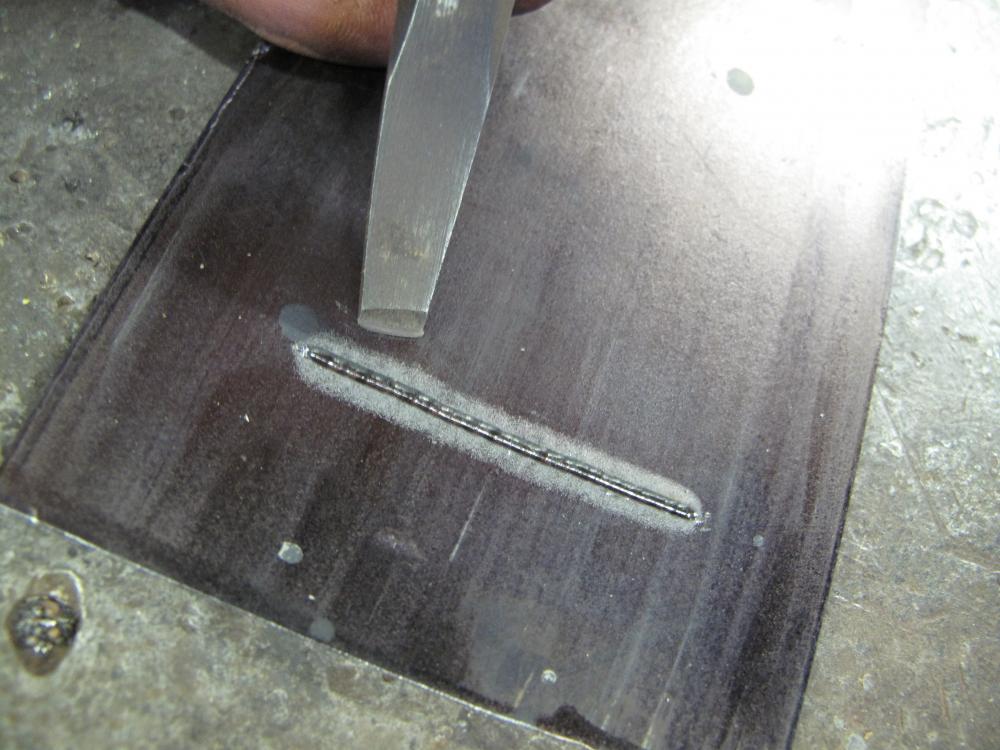
Step 3: Heres where we go over the line again, establishing it as a solid line rather than a bunch of individual chisel cuts. If you have a line thats a bit off from the rest, its easy to fix by simply bridging the two cuts with your chisel.
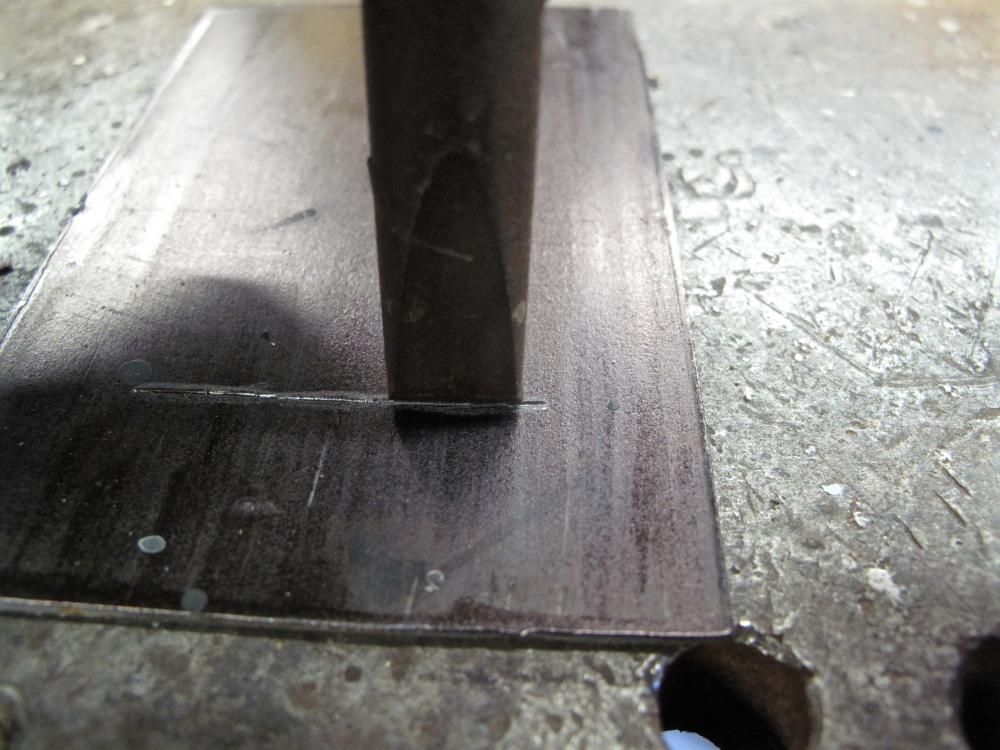
Now we do the same basic process all over again, but this time using the mid-sized chisel with the fat ¼ edge.
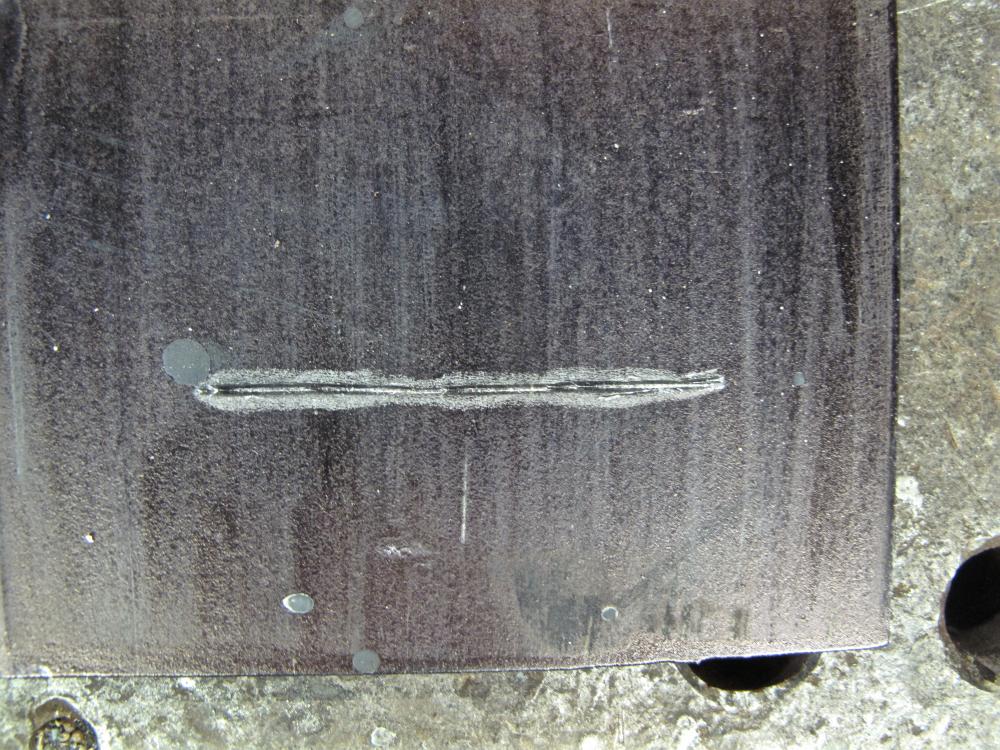
Because the bevel on this chisel is sharper than on the previous chisel, it sits down deeper in the cut youve already made. With less surfact contact and edge length, a light blow of the hammer really sinks the edge deep. Go along the line with light taps. Make a second or third pass if you feel like it. The work goes quickly now that you're to this stage.
Step 4: Youd think were done, but theres still one more chisel to use. I really like using the small chisel because the short, sharp edge gives you extra depth and creates a nice shadow line. Plus if you give the piece a coat of wax, the depth gets filled to some degree and having a bit extra keeps the finished piece looking good.
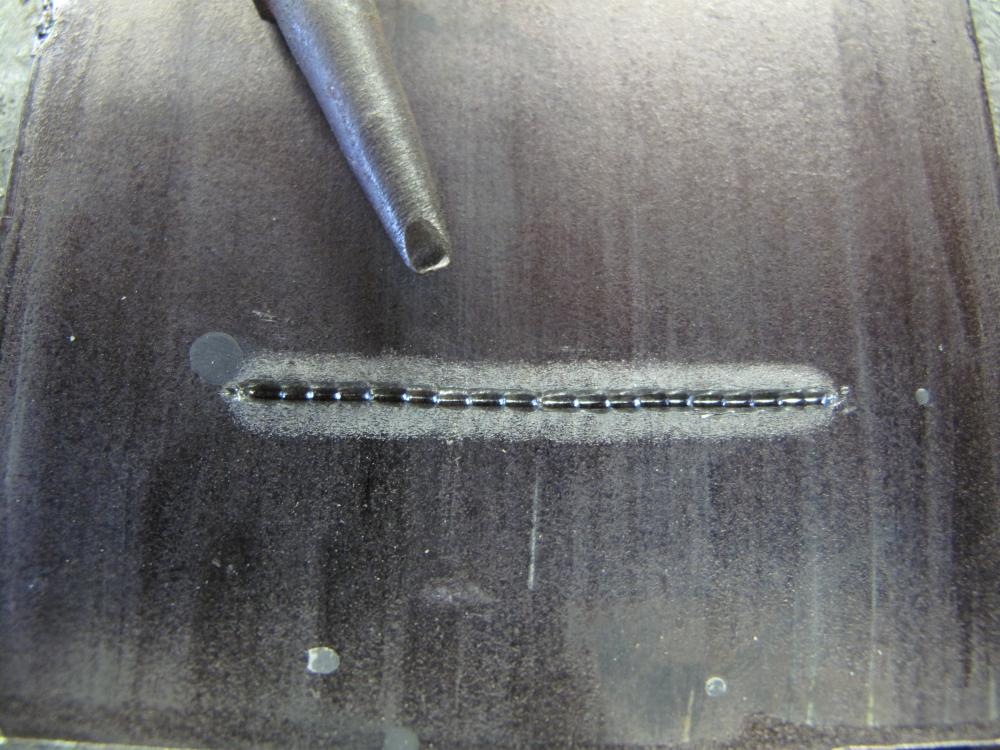
Just like with the other two chisels, youre doing a single tap and moving down one edge length. On the second pass, you can bridge the two cuts and even everything out.
-
Post Thanks / Like - 2 Likes, 0 Dislikes
-
Re: Blacksmithing and forging
Step 5: The Clean Up. No matter how hard you try, the cut isnt going to be perfect. This is when you use the two larger chisels to go back over the line, evening things out.
If you want to add a bit of "something special" to the ends of the line, there are a lot of ways to go about it. Two of my favorites.....
Start just a hair past the end of your cut and drive the chisel in at an angle.
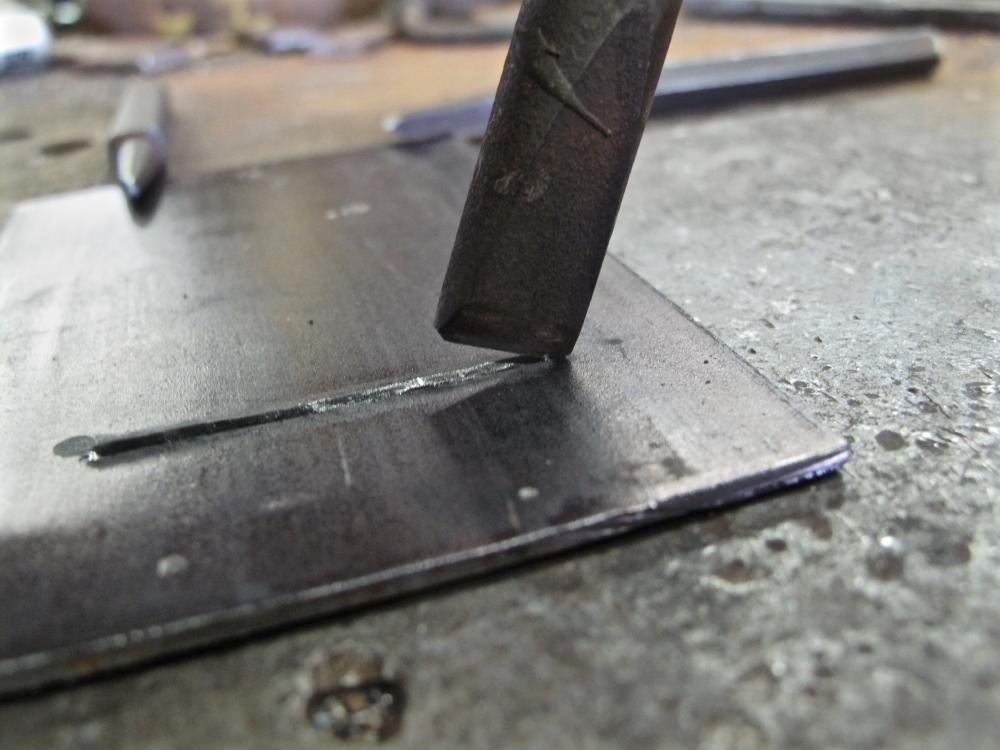
This adds just a hit of a flair to the end of the line.
Or, do likewise with your center punch to create a ball end.
-
Post Thanks / Like - 4 Likes, 0 Dislikes


 Reply
Reply


